Create a new company file
In this topic you learn how to create a new company file in your MYOB software.
Before you can start recording transactions for your company, you first need to create
your company file. This topic guides you through the steps to using
the New Company File Assistant so that you know the information you need when you create your
company file.
Using the New Company File Assistant
The first step in using the New Company File Assistant is to open it.
There are two ways in which this may be done:
1. Opening your MYOB software for the first time?
If you are opening your MYOB software for the first time, you may be presented with this illustration:
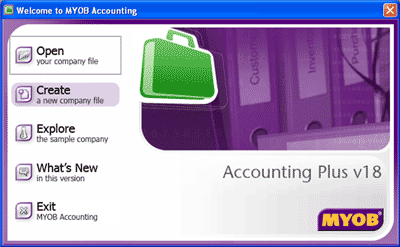 Click the Create a new company file icon. This will open the New Company File Assistant.
2. Already have another company file open?
If you already have another company file open, from the main
menu bar, Select File → New (or press <Ctrl> + <N>
on your keyboard).
Now that you have opened the New Company File Assistant...
The New Company File Assistant is made up of a number of
interactive windows and begins with the introduction window shown below.
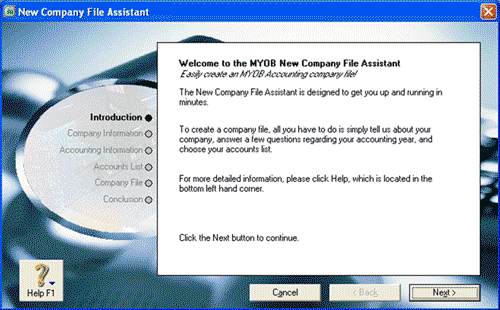
From this initial window there are two ways to navigate through the windows of the
New Company File Assistant. You can click on an item in the navigation list to the left of the
'Welcome to the MYOB New Company File Assistant' window. Alternatively, you can click the Next button
to navigate through the screens in sequential order. You can use the navigation list or the Back button
should you need to change any information entered in earlier windows. Your company file will be
created once you press the Next button in the 'Create your company file' window toward the end
of the assistant. Note that if you
press Cancel before the new company file is created, you will need to start the New Company File Assistant
from the beginning again.
The following is a list of the windows in the New Company File Assistant. Be careful when
entering information into the New Company File Assistant to create your company file.
While there is some information
that can be changed after your company file has been created, there are other settings that you
will not be able to alter, so you need to make sure you are accurate with your work.

Helpful Hint!
If you are completing our software practice set, you will find all the information
required to set up your company file in the 'Conversion to MYOB' page in your practice set.
Note that you are not required to enter your 12 digit MYOB product serial number.
Remember to enter your full name after your company name in the Company Name field!
Company Information
After clicking the Next button in the Introduction window,
you are required to enter essential information about your company.
This information includes the company name, A.B.N.,
address and phone number.
Once this information has been entered, click Next.
You will not be able to change the company name or A.B.N. after the company file has been created.
However, you are able to edit the address and phone number by going to
the main menu bar and selecting
Setup → Company Information.
Accounting Information
Next, you need to complete the 'Tell us about your accounting year' window by
specifying the following:
- Current Financial Year: Enter your current financial year.
If your financial year occurs across
two calendar years you need to specify the year in which your financial year ends.
For example, if your financial year is from 1 July 2010 to 30 June 2011, then you
need to enter 2011 in the Current Financial Year field.
- Last Month of Financial Year: Select the month in which your
financial year ends.
- Conversion Month: Select the month in which you
will begin to enter transactions.
- Number of Accounting Periods: Select the number of accounting periods
you wish to use for reporting purposes.
Make your selections carefully. Once your company file has been created
you will not be able to alter this information. Once you are satisfied with your selections, click Next.
You are then presented with the 'Please confirm your accounting information' window where you can
review the information you just entered. Once you have confirmed your selections are correct, click Next.
Accounts List
The next step is to complete the 'Build your accounts list' window by selecting how you would like to
build your accounts list (chart of accounts).
If you select that you would like to start with a list provided by your MYOB software, clicking Next will take you to the
'Select your accounts list' window. There, you are required to
select an appropriate industry classification and type of business before clicking Next
to take you to the 'Create your company file' window.
The other two options in the 'Build your accounts list' window takes you straight to the
'Create your company file' window.
Company File
Clicking Next in the 'Create your company file' window will create your company file.
Before you click next, you should review the location on your computer where your MYOB software saves your
company file. If you are using a public computer, you should click the Change button to save
the location of your company file to a portable storage device. Once you have selected the location,
click Save. You are then able to click Next, where your MYOB software will take a moment to create your company file.
Conclusion
You have now created your company file and should see the window below:

For now, click Command Centre to close the New Company File Assistant and open the command centre
in your MYOB software.
Instructions on how to open the Setup Assistant once you are in your MYOB software can be found in the
Setup section
in this Learning Centre.
Helpful Hint!
If you are completing our software practice set,
your next step is to change the security preferences in your MYOB software. Instructions on how this is completed
are found in the
Editing a transaction page in the
Troubleshooting section of this
Learning Centre.
Return to the top