Exploring your MYOB software
This is a great place to start learning about your MYOB accounting software.
You will explore the sample company, Clearwater Pty Ltd, and learn how to navigate your MYOB software
by learning the key parts of the main window.
The concepts covered in this topic are listed below:
Open the sample company, Clearwater Pty Ltd
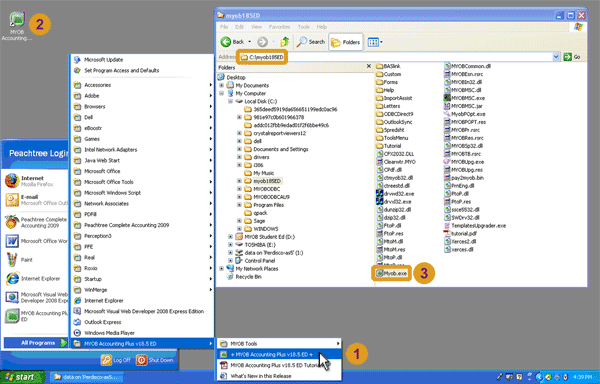
The first place to start is to open your MYOB accounting software. There are three main ways to do this
as illustrated in the following image.
| No. |
Description |
 |
Through the start menu
Depending on the version of your MYOB software you are using, select either:
Start → All Programs → MYOB Accounting Plus v18.5 ED → + MYOB Accounting Plus v18.5 ED +
OR
Start → All Programs → MYOB AccountRight Plus v19 ED → + MYOB AccountRight Plus v19 ED +
|
 |
Desktop shortcut
Find your MYOB accounting software icon on your desktop and double click it.
|
 |
Explorer window
Open an explorer window to where you installed your MYOB software. Locate the file called Myob.exe
and double click it to open your MYOB software.
|
Once you have opened your MYOB software you should see the following window:
The initial startup screen in MYOB Accounting Plus v18
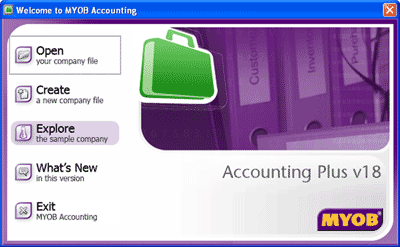
From this initial startup screen click 'Explore the sample company'.
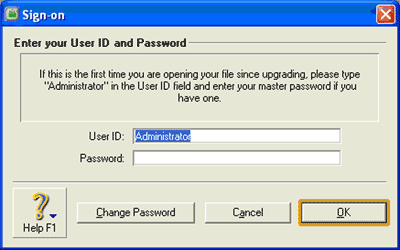
If you see the following Sign-on screen,
click OK to open the sample company.

Helpful Hint!
If you are completing our software practice set,
you open your company file by selecting 'Open your company file' in
the initial startup screen in your MYOB software. This then opens a window where you
can locate where you saved your company file and then open it. You may also see the
Sign-on screen where you just leave the Password field blank and click the OK button.
If you are using MYOB Accounting Plus v18
you may then see the following message:
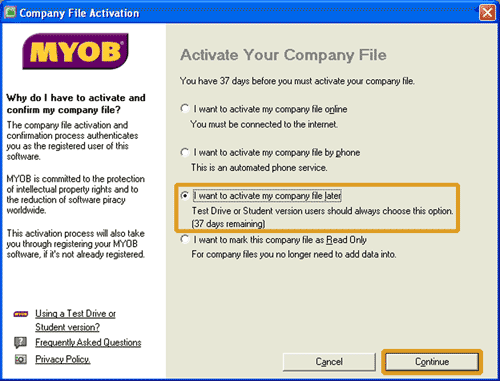
If you are completing our software practice set you are using the student version
of your MYOB software. Select the 'I want to activate my company file later' option then click the
Continue button. If you are using the student version of the software,
you are not required to activate your company files.
Instead, you have 90 days from the creation of the file to use that file. After
the 90 day period ends, the company file turns into a read-only file where you will not be able to add
any more new information into the file.
After clicking the Continue button you will be presented with a message that reminds you how many days you
have left to use the company file before it becomes a read-only file.

Clicking the OK button will take you to the Command Centre for that company file. You are now ready to
start work!
But for now, remember to open the sample company file and follow along with the instructions below.
Illustration of the main window
Welcome to the main window in your MYOB accounting software! Whenever you open a company file you will be
presented with the
main window. You use this main window as the basis from which to
record transactions and perform many accounting tasks in your MYOB software.
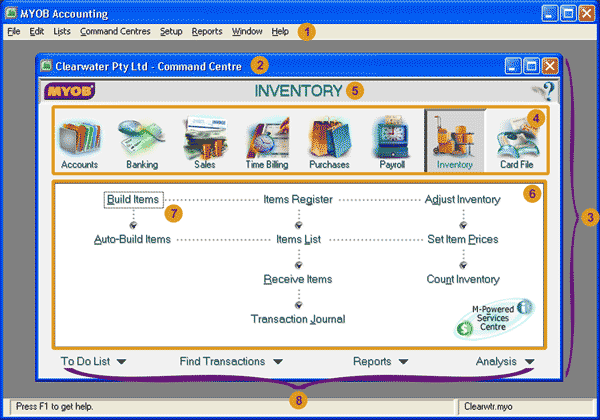
The screenshot below shows an example of the main window. Notice that reference numbers
are written next to several parts of the window. These are explained in the table that follows.
The main window with reference numbers
| No. |
Description |
 |
Menu Bar:
The menu bar is a horizontal bar that shows the main menus available within your MYOB software.
|
 |
Name of the window (Window title):
The name of the window is displayed at the top of the window. In this example, the
Command Centre window is shown.
The Command Centre window always starts with the name of the company whose file is
currently open followed by a dash and the term 'Command Centre'.
|
 |
Command Centre:
A Command Centre refers to a group of tasks and information that pertains to a specific
area of a business.
There are eight Command Centres in your MYOB software:
- Accounts
- Banking
- Sales
- Time Billing
- Purchases
- Payroll
- Inventory
- Card File
|
 |
Command centre icons:
The command centre icons are positioned at the top of the command centre window.
There are eight command centre icons, each corresponding to a different
command centre. Clicking on a command centre icon will open that
particular command centre, allowing users to quickly switch between command centres.
Users can only access one command centre at a time by clicking the required command centre icon.
|
 |
Selection indicator:
The selection indicator shows the name of the command centre that is currently opened, which is
the Inventory Command Centre in the screenshot provided.
|
 |
Flowchart:
The screenshot provided shows the flowchart section for the Inventory Command Centre.
The flowchart section contains options that represent tasks that can be performed in that section.
|
 |
Flowchart task option:
Each of the task options listed above represents a major task associated with the
command centre that is currently opened.
Clicking a task option will open a window where the information related to that
task is entered.
|
 |
Quick access panel:
The lower part of the command centre window provides instant access to four useful
tools in your MYOB software:
- To Do List
- Find Transactions
- Reports
- Analysis
Click on the name of one of these tools will open a window related to the command centre
currently displayed. Alternatively, click
the down arrow icon next to each of the four tools
if you wish to view all the options available for that tool for all command centres.
|
top
Examples of windows within your MYOB software
The screenshots below show examples of windows to help you
understand the terms used to describe parts common to many windows you will
find within your MYOB software.
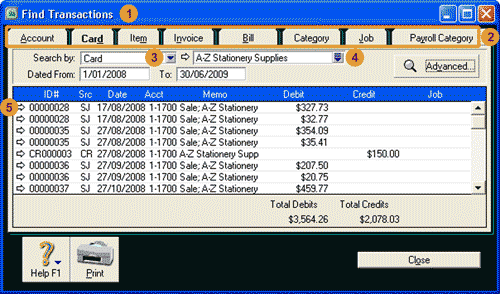
A window with multiple tabs
In this case the Find Transactions window is illustrated to show
that a window can have multiple tabs. The table that follows
explains the terms used to describe parts common to many windows found in your MYOB software.
Notice that
reference numbers are written next to several parts of the window
to help you identify the appropriate field or icon in the screenshot.
An example of a window with reference numbers
| No. |
Description |
 |
Name of the window:
In this case, the name of the window is Find Transactions.
|
 |
Tabs:
A window may have two or more tabs. Click appropriate tabs to enter, review or locate existing
information relating to that tab.
|
 |
Field with a drop down list:
Press this arrow icon to view a list of information from which you can make a selection.
|
 |
Search icon: 
The search icon indicates that to complete the appropriate field, you are required to
select one of the existing records that has previously been created.
Once this search icon is clicked your MYOB software displays the
Select from List window where you can select the
record appropriate to this field.
|
 |
Zoom arrow icon: 
Click the zoom arrow icon to view a particular transaction or record in detail.
|
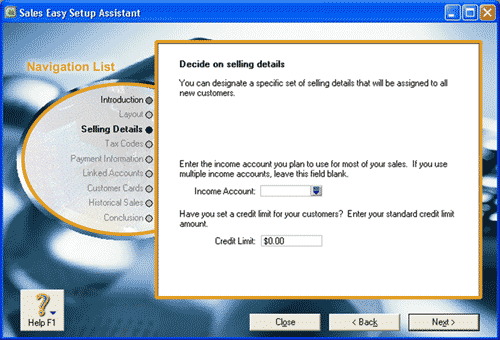
An example of a window with an internal window
The screenshot below shows a window that has a window within it! Here we can see the
Sales Easy Setup Assistant window. Within that window, the white area is known as the
'Decide on selling details' window. You can navigate between screens of windows like this
by clicking on the navigation list to the left of the 'Decide on selling details' window.
An example of a window with an internal window
 Return to the top