Recording a miscellaneous cash receipt

Helpful Hint!
If you are completing our software practice set,
you use the Receive Money window in the Banking Command Centre to record cash receipts
other than receipts from customers. Receipts from customers are recorded in the Receive Payments
window through the Sales Command Centre.
Besides collecting receipts from customers, businesses sometimes receive miscellaneous
cash receipts from parties
such as loan providers, from suppliers for cash refunds and from the owners of
the business for further capital investment.
If you are completing
our software practice set, you are asked to
enter those miscellaneous cash receipts into the Receive Money window in the Banking Command Centre.
Your MYOB software will then
use the information saved in that window to record the journal
entry to the cash receipts journal and post the transaction to
the appropriate accounts.
This topic explains where and how to
record a miscellaneous cash receipt into your MYOB software.
To record the miscellaneous cash receipt, open the
Banking Command Centre and click Receive Money to open the Receive Money window.
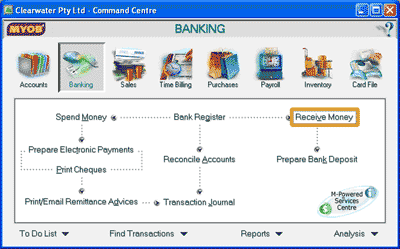
This opens the Receive Money window where you are able to enter the details of the receipt.
The following screenshots and reference table show step-by-step instructions on
how to enter the miscellaneous cash receipt into the Receive Money window.
Note that each step is assigned a reference number to help you identify the
appropriate field or icon in the screenshots.
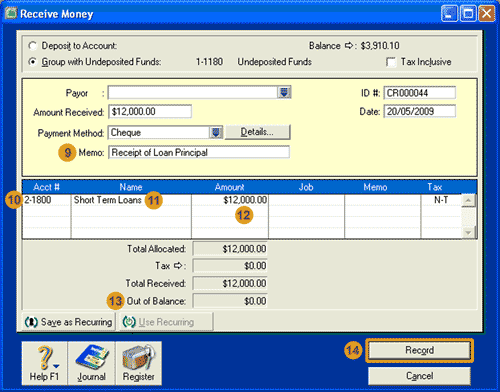
The Receive Money window with reference numbers

| Step |
MYOB software field or icon |
Action |
 |
Selecting the account |
There are two options to select the general ledger account to which the receipt will be recorded.
Deposit to Account:
If the receipt is to be directly deposited into a bank account, select the Deposit to Account option.
Then use the search icon to select the general ledger account that records receipts for that
bank account.
Group with Undeposited Funds:
If you are going to collect a group of receipts and bank them together in one batch, select this option.
The receipt will be recorded in the Undeposited Funds account when you click the Record button.
Later, when you take the receipts to the bank, you will prepare a deposit slip. It is then that
the receipt is transferred from the Undeposited Funds account to the general ledger account that
records receipts for that bank account.
If you are completing our software practice set you are asked to select the
Group with Undeposited Funds option. This is because, at the end of each period, you will be
required to prepare a bank deposit slip for a group of receipts collected during the period.
|
 |
Tax Inclusive |
If the cash receipt includes tax, leave this box ticked. Otherwise click the box to remove the tick.
|
 |
ID # |
Accept the identification number (cash receipts reference number) your MYOB software
automatically assigns to this cash receipt or enter the
number you wish to use.
|
 |
Date
|
Enter the date of the cash receipt.
|
 |
Payor |
If you have set up a card for this payor you can use the search icon to select the payor from the list.
Otherwise, leave this field blank.
|
 |
Amount Received |
Enter the dollar amount received from the payor.
|
 |
Payment Method |
Click the search icon to open the Select from List window where you can choose the method of payment such as
Cash or Cheque by clicking on it. Then, click the Use Method button.
|
 |
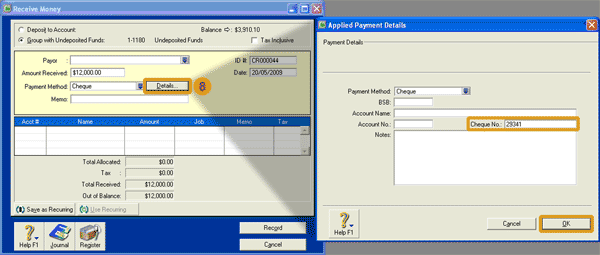
Details... |
Click the Details button to open the Applied Payment Details window where you are able to enter
information about the receipt, such as the cheque number. Note that the fields displayed in this window
change depending on the payment method selected. Once you have entered the required information
click the OK button.
|
 |
Memo
|
Type in a description of the transaction or any other relevant information.
|
 |
Acct # |
Type in the account number of the account to be credited for this transaction. Alternately when you select this
cell, the search icon appears where you are able to select the account using the Select from List
window.
|
 |
Name |
When you select the account number, your MYOB software automatically populates this field with the name
of the account to be credited in this transaction. Read this name to check that you have selected the correct
account.
|
 |
Amount
|
Your MYOB software automatically populates this field with the amount received
(including tax if the Tax Inclusive box is ticked). You can either accept this amount
or manually alter it if required.
|
| Helpful Hint!
|
You can allocate the cash received to more than one account by repeating steps 10 to 12 in a new row.
|
 |
Out of Balance
|
This cell reports the difference between the amount entered in the Amount Received
field and the total of the amounts recorded in the Amount column. Check that the out of
balance amount is $0.00 otherwise you will not be able to record the
receipt. If you have just entered an amount in the Amount column or the Amount Received
field, you may need to click out of these cells before your MYOB software recognises
the amount you have entered into those fields and automatically updates the Out of Balance field.
|
 |
Record
|
Check that the details entered into the Receive Money window
are correct. Then, the click the Record button to journalise the cash receipt and post the transaction
to the applicable accounts.
|
Helpful Hint!
If you are completing our software practice set,
you may wish to check that the receipt has been recorded in the accounts. To do this,
from the Banking Command Centre:
- Select Transaction Journal.
- In the Transaction Journal window, click the Receipts tab.
- Enter an appropriate date range in the Dated From and To fields.
- Find the transaction in the list to view the accounts debited and credited in the transaction.
Return to the top