Preparing a bank reconciliation

Helpful Hint!
If you are completing our software practice set,
you are asked to prepare a bank reconciliation of the Cheque Account. To assist you with
this task, you will be provided with
the previous month's bank reconciliation statement (prepared
manually) and the current month's bank statement.
Preparing a bank reconciliation statement on a periodic basis is an important cash control
procedure. It serves to verify the balance of cash shown in the general ledger
against the balance shown on the bank statement. Those two balances are rarely
equal owing to differences in timing in recording transactions.
Additionally, the bank reconciliation can highlight any errors recorded in either the company's accounts
or in the bank statements.
This topic explains where and how a bank reconciliation is prepared
in your MYOB software.
Note that this topic demonstrates the process of bank reconciliation if
you are using a bank statement that is in hard copy or external to your MYOB software. However,
if the bank statement provided by the bank is in electronic format and you wish to
import it electronically into your MYOB software,
the process will differ slightly from the instructions below.
To perform a bank reconciliation in your MYOB software, open up the
Banking Command Centre and click the Reconcile Accounts icon.
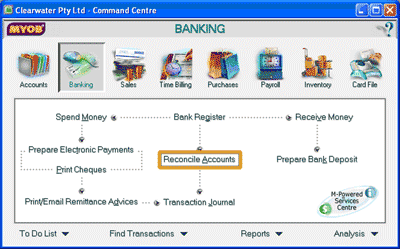
The Reconcile Accounts window then appears where you can perform the bank reconciliation process
for any cash account in the general ledger. The following screenshots and reference
table show step-by-step instructions on how to
prepare a bank reconciliation for the Cheque Account using the Reconcile Accounts window.
Note that each step is assigned a reference number
to help you identify the appropriate field or icon in the screenshots.
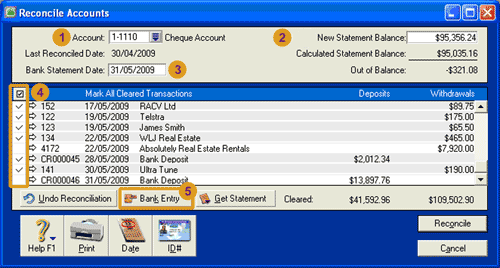
The Reconcile Accounts window with reference numbers
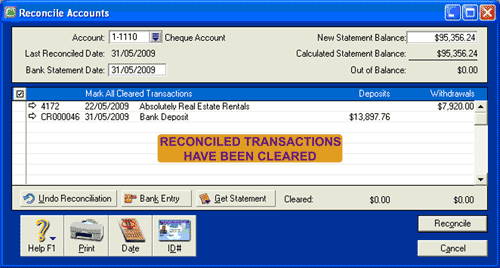
| Step |
MYOB software field or icon |
Action |
| Reconcile Accounts window
|
 |
Account |
Type in the account number of the cash ledger account to be reconciled. If you do not know
the account number you can click the search icon to display the
Select from List window where you can click on the account you wish to use.
Click the Use Account button to select the account.
|
 |
New Statement Balance |
Enter the ending balance of your bank account as it appears on your bank statement.
|
 |
Bank Statement Date |
Enter the closing date that appears on your bank statement. |
 |
Select (to be reconciled) column |
Notice that your MYOB software automatically displays a summary of transactions that have been
recorded in the cash ledger account but have not yet been reconciled to the bank statement.
If you are completing our software practice set,
the next step is to review the previous month's bank reconciliation statement.
To confirm that outstanding amounts in the
previous bank reconciliation statement have now appeared on the current month's bank statement, place
a tick mark next to the amounts shown on both statements.
Next, identify all items that appear on both the current month's bank statement
and in the Reconcile Accounts window.
If an item in the list appears on the bank statement,
select that item by clicking the cell in the Select column for that item/transaction to enter
a tick mark in that column. If you accidentally placed a tick in the incorrect cell,
just click the cell again to remove the tick. As each item is ticked you will notice it
turns grey so you can identify items that have and have not been reconciled to the bank statement.
Note that it is good practice to also place a tick
mark next to that item on the bank statement to help you in this process
If you wish to view the details of a particular transaction in the list,
click the zoom arrow next to that transaction.
You will then be presented with the window for the transaction that
you want to know about. Close that window when you are finished.
As you reconcile each transaction, notice that your MYOB software automatically updates the
Out of Balance amount found toward the top right hand side of the Reconcile Accounts window.
The aim of the bank reconciliation process is to have this out of balance amount to
equal $0.00.
Once you have finished identifying all items that appear on both the current month's bank statement
and in the Reconcile Accounts window, it is highly likely that the Out of Balance amount is
not yet $0.00. This will be because there are items that appear on your bank statement
that have not yet been recorded in your accounts, such as service charges (transaction fees)
and interest earned on your account. The next step is to record such items into your
MYOB software.
|
 |
Bank Entry |
Click the Bank Entry icon to open the Bank and Deposit Adjustments window where you can enter the
details of the service charges and interest earned on your account.
If you are using AccountRight Plus v.19 you will need to click the
Actions button and then select Bank Entry from the list.
|
| Bank and Deposit Adjustments window
|
 |
Service Charges section
|
Amount: Type in the amount of the service charge (transaction fee)
as shown on the bank statement.
ID #: Accept the identification number your MYOB software
automatically assigns to this transaction or enter your preferred number.
Date: Enter the date for the transaction.
Expense Account: Type in the account number of the
expense account you wish to use to record the service charges.
If you do not know the account number you can click the search icon to
display the Select from List window where you can click on the account
you wish to use. Click the Use Account button to select the account.
Memo: Type in a description of the transaction.
Tax Code: Type in the tax code for the transaction.
If you are completing our software practice set you are
advised to use the FRE tax code to record service charges (transaction fees).
|
 |
Interest Earned section
|
Amount: Type in the amount of the interest earned
as shown on the bank statement.
ID #: Accept the identification number your MYOB software
automatically assigns to this transaction or enter your preferred number.
Date: Enter the date for the transaction.
Income Account: Type in the account number of the
income account you wish to use to record the interest earned.
If you do not know the account number you can click the search icon to
display the Select from List window where you can click on the account
you wish to use. Click the Use Account button to select the account.
Memo: Type in a description of the transaction.
Tax Code: Type in the tax code for the transaction.
If you are completing our software practice set you are
advised to use the ITS tax code to record interest earned.
|
 |
Record button
|
Check that the details entered into the Bank and Deposit Adjustments window are correct.
Then, click the Record button to journalise the entries and post
the transactions to the applicable accounts.
|
| Reconcile Accounts window
|
 |
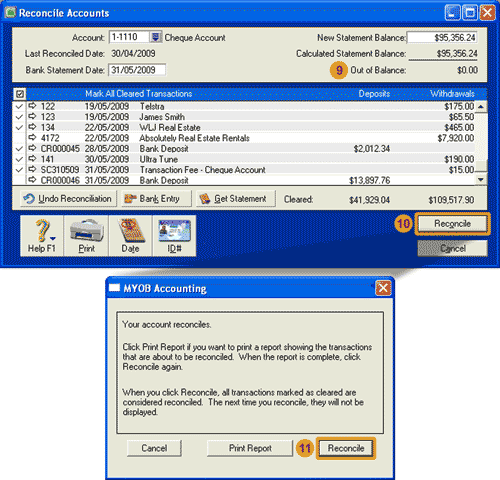
Out of Balance
|
If you have completed the bank reconciliation process correctly,
the amount shown in the New Statement Balance field should equal the amount shown in the
Calculated Statement Balance field and the
Out of Balance field should report an amount of $0.00.
If not, check your work again and confirm that you have not made errors
when preparing the bank reconciliation and have correctly entered
all cash transactions into your MYOB software.
To achieve reconciliation you may need to contact the bank if you
suspect there is an error on your bank statement or
you may need to record a correcting entry if you discover an error in your accounts.
|
 |
Reconcile button
|
Check that the Out of Balance field reports $0.00, then click the Reconcile button to
record the reconciliation.
This opens a new window where you are advised that your account reconciles.
|
| Pop-up window
|
 |
Reconcile button
|
To complete the bank reconciliation process, click the Reconcile button
in the pop-up window.
If you look at the Reconcile Accounts window, you will
notice that the transactions you selected as reconciled in step 4
have been removed from this list. You may then close the Reconcile Accounts window.
|
Helpful Hint!
If you are completing our software practice set,
after you have performed the bank reconciliation process, you are asked to print the
bank reconciliation report. From the main menu bar, select Reports then Index to Reports to open the
Index to Reports window. Click on the Banking tab, select Reconciliation Report and then click the Display
button to view the Reconciliation report. Just make sure that you have the correct date of the
reconciliation in the Statement Date field, otherwise you may be looking at a reconciliation report
for a different accounting period!
Alternatively, you may have noticed that after pressing the first Reconcile button (in the
Reconcile Accounts window - step 10 above), the MYOB Accounting window offers an option to
print the Reconciliation Report before you actually record the
reconciliation. If you select the Print Report button at this stage, the printed reports you
collect from your printer will be slightly different to the reports accessed through the
Index to Reports window. In particular, the report accessed before
recording the reconciliation has a section called 'Cleared Cheques' whereas this same section
in the report accessed through the Index to Reports window is called 'Reconciled Cheques'.
Similarly, the 'Cleared Deposits' section in the report before reconciliation becomes
'Reconciled Deposits' after the reconciliation process has been completed.
Return to the top