Sales returns
When selling merchandise to customers, sometimes things don't go quite as planned.
Occasionally, customers may return items of inventory for various reasons.
This topic explains where and how a sales return is recorded in Sage 50.
In the Customers & Sales Navigation Center click the Credits and Returns icon
and select New Credit Memo from the drop down list provided.

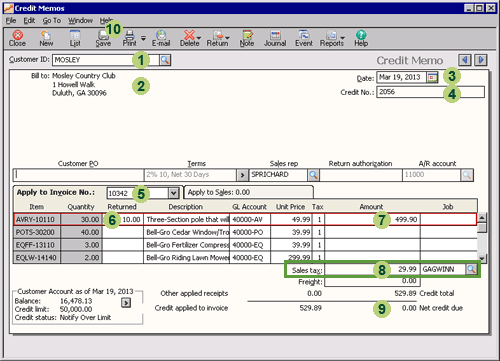
This opens the Credit Memos window where you can enter the details of the sales return into Sage 50.
The following screenshot and reference table show step-by-step instructions on how to enter the
sales return from a customer into the Credit Memos window in Sage 50.
Note that each step is assigned a reference number to help you identify the
appropriate field or icon in the screenshot of the Credit Memos window.
The Credit Memos window with reference numbers

| Step |
Sage 50
field or icon |
Action |
 |
Customer ID |
Select the name of the customer.
|
 |
Bill To |
Sage 50 automatically displays the address of the customer.
|
 |
Date |
Click the calendar icon to select the date of the sales return.
Note that Sage 50 Complete Accounting 2015 and 2017
provide two date fields; one field for the credit date
and a separate field for the due date. If you are completing the
Sage 50 Practice Set you should enter the date of the sales return into
the 'Credit date' field. Sage 50 will then calculate the due date
and automatically enter this date into the 'Due date' field.
|
 |
Credit No. |
If you leave the Credit No. field blank, Sage 50 will not
automatically assign a credit number when you save the credit memo. However, Sage 50
will automatically assign an credit number
to your credit memo if the credit memo is printed.
If you are completing the
Sage 50 Practice Set,
you are not asked to print credit memos, only to save them. Instead, you are advised of
the credit memo number to use, so you should enter that number into the Credit No. field.
Even though Sage 50 will still journalize the sales return without a credit number,
you should still ensure that an credit number is recorded for each credit memo.
|
 |
Apply to Invoice No.
|
In the drop down box next to Apply to Invoice No. select the invoice number relating
to the returned items. Sage 50 automatically populates the rows below with the items sold on that invoice.
|
 |
Returned
|
Record the number of items returned.
|
 |
Amount column
|
Sage 50 automatically calculates the value of each item type returned.
|
 |
Sales Tax
|
If the original invoice had sales tax applied to it
Sage 50 automatically calculates the amount of sales tax that will no longer be collected from the sale.
|
 |
Credit Total and Credit Applied to Invoice
|
Sage 50 automatically calculates the total of the Amount column (Credit Total)
and the amount applied to the invoice.
|
 |
 Once you have reviewed the information in the Credit Memos window, remember to click the Save icon to
record the sales return,
journalize the transaction and post it to the applicable accounts.
|
And just to double check...
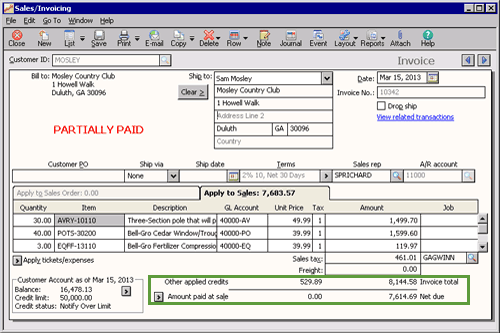
If you want to check that the credit note has been applied to the invoice, open the related invoice in Sage 50.
For instructions on how to find transactions in Sage 50, including how to open an invoice, see the
Find transactions page in this learning center.
In the following screenshot notice that the amount of the credit memo appears in the
Other Applied Credits line near the bottom of the window. The amount reported as Net Due
has been updated to reflect that the
amount of the credit memo has been subtracted from the Invoice Total.
The Sales/Invoicing window with the credit memo applied to it
 Return to the top