Recording a sales order

Helpful Hint!
If you are completing the Sage 50 Practice Set,
sales orders are to be recorded in the Sales Orders window and the invoice created when the
merchandise is delivered.
One of the first steps in the sales cycle is receiving an order from a customer.
In general, there are two ways this information can be recorded.
The first way is to immediately create a
sales order and then to create the related sales invoice when the items are to be delivered.
Alternatively, if the items are to be delivered immediately, the second way
is to not create a sales order and to just create the sales invoice
for the sale.
The method chosen does have consequences as to when
Sage 50 records the information from the sale into the general ledger accounts.
The general ledger accounts are updated when the
sales invoice is saved, not when the
sales order is saved.
When the sales order is saved, Sage 50 records the sales order information
into the sales order journal. Entries in this journal are not
posted to the general ledger accounts. It is only when the related sales invoice is saved
that the general ledger accounts are updated and the sales order is updated to reflect
the number of items shipped.
You can learn how to record the sales invoice in the
Sales transactions page in this learning center.
Sales orders are useful
if, for example, you do not have the merchandise on hand to fulfil an entire order from a customer straight away.
You can use the sales order functionality in Sage 50 to track how much of the merchandise you have
delivered and how much is still on order.
This topic shows you where and how to enter sales order information in Sage 50.
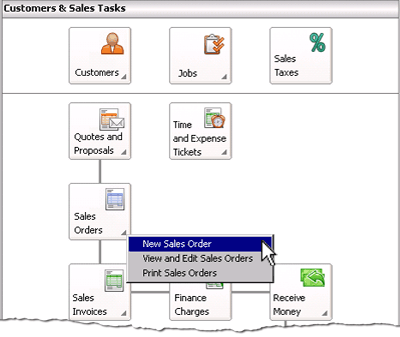
To record a sales order in Sage 50, open the Customers & Sales Navigation Center.
Click on the Sales Orders icon and select New Sales Order from the list of options presented.

This displays the Sales Orders window where you can enter the details of the sales order into Sage 50.
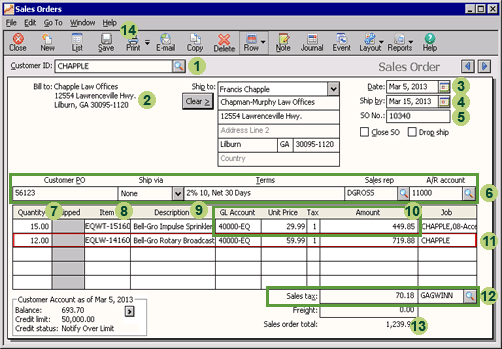
The following screenshot and reference table show step-by-step instructions on
how to enter a sales order into the Sales Orders window in Sage 50.
Note that each step is assigned a
reference number to help you identify the appropriate field or icon in the
screenshot.
The Sales Orders window with reference numbers

| Step |
Sage 50
field or icon |
Action |
 |
Customer ID |
Select the customer who has ordered the goods.
|
 |
Bill To,
Ship To |
These fields are automatically populated when you select the customer. You can accept these default terms
or change the Ship To details if required.
|
 |
Date |
Click the calendar icon to select the date of the sales order. |
 |
Ship By |
Click the calendar icon to select the date by which the goods are required to have shipped.
|
 |
SO No. |
If you leave the SO No. field blank, Sage 50 will automatically assign a sales order number
to your sales order when the sales order is printed. However, if you are completing our
Sage 50 Practice Set,
you are not asked to print sales orders. Instead, you are advised of
the sales order number to use, so you should enter that number into the SO No. field.
|
 |
Various
|
Enter the customer's purchase order number in the Customer PO field if known.
The other fields are automatically populated when you select the customer. You can accept these default terms
or change the details if required.
|
 |
Quantity |
Enter the number of the first item ordered.
|
 |
Item |
Enter the Item ID of the item of inventory ordered.
|
 |
Description |
When you select the item of inventory using the Item field, Sage 50 automatically populates
this field with the longer description of the item of inventory. Read this description to
check that you have selected the correct item.
|
 |
GL Account,
Unit Price,
Tax,
Amount,
|
Sage 50 automatically populates these fields with the default information
specified when that item of inventory was set up. You can either accept the default information
or enter any changes directly into the appropriate field. Note that if you change the unit price, Sage 50
automatically calculates the new Amount of the item. Alternatively if you change the total amount,
Sage 50 will calculate and update the Unit Price.
|
 |
New sales order row
|
You can enter additional items of inventory ordered by repeating steps
7 to 10. If additional rows are required, select the Row icon at the top
of the Sales Orders window and then select the Add icon.
|
 |
Sales Tax
|
Select the sales tax applicable to the sale. In the example above,
the sales tax selected is GAGWINN. Once the sales tax has been selected,
Sage 50 automatically calculates and displays the sales tax on the
sales order.
|
 |
Sales Order Total
|
Sage 50 automatically calculates the total value of the sales order.
|
 |
 Once you have entered the information in the Sales Orders window, remember to
review your entries and click the Save icon to record the
sales order.
|
Return to the top