Recording a salary payment

Helpful Hint!
If you are completing the Sage 50 Practice Set,
you are asked to process salaries at the end of a given month.
Once you have created a record for a salaried employee, you are ready to
record a salary payment to that employee. This topic shows you where
and how to enter the salary paid to the employee into Sage 50. Note
that the recording of wages follows a similar
process to that illustrated here for a salary payment but wages are calculated based on the
number of hours worked.
To record a salary payment in Sage 50, ensure you are in the Employees
& Payroll Navigation Center, click the Pay Employees icon and select
Enter Payroll for One Employee from the drop down list provided.
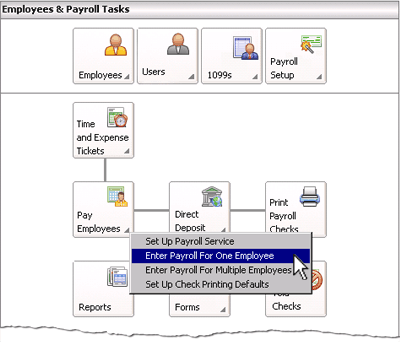
If your chart of accounts has more than one account with an Account Type classified as Cash,
you may be prompted to select a cash account to use for the transaction. Next,
the Payroll Entry window will be displayed where you can enter the details of the salary payment into Sage 50.
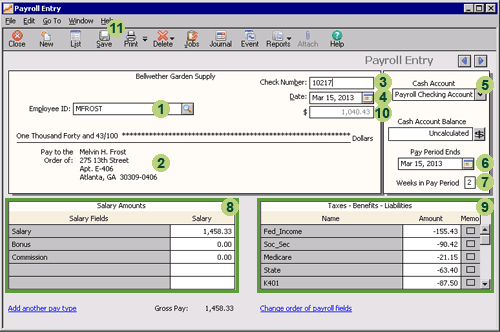
The following screenshot and reference table show step-by-step instructions on
how to enter a salary payment into the Payroll Entry window in Sage 50.
Note that each step is assigned a
reference number to help you identify the appropriate field or icon in the
screenshot.
The Payroll Entry window with reference numbers
| Step |
Sage 50
field or icon |
Action |
 |
Employee ID |
Select the employee to whom the salary payment is made.
|
 |
Pay to the Order of
|
Notice that once you have selected an existing employee in the Employee ID field,
Sage 50 automatically displays the name and address of the employee.
|
 |
Check Number |
If the employee is paid by check, enter the reference number of
the check in the Check Number field. Note that if you leave the Check Number
field blank, Sage 50 will automatically assign a check number if the check is
printed through Sage 50. However, if you are completing the
Sage 50 Practice Set, you are not asked to print
checks. Instead, you are advised of the check number to use, so you
should enter that number into the Check Number field.
|
 |
Date |
Click the calendar icon to select the date of the payment.
|
 |
Cash Account |
If the business has more than one type of cash account, confirm that the correct account
has been selected.
If you are completing the Sage 50 Practice Set,
you are asked to use the Checking Account.
|
 |
Pay Period Ends |
Click the calendar icon to select the last date in the payroll period for which
the salary payment is made.
|
 |
Weeks in Pay Period
|
Sage 50 automatically populates this field with the default
information specified when that employee's record was set up.
You can either accept the default information or enter any changes
directly into the Weeks in Pay Period field.
|
 |
Salary Amounts |
Sage 50 automatically populates the fields in the Salary Amounts columns
with the default information specified when that employee's record
was set up.
You can accept these values or change the details if required.
|
 |
Taxes - Benefits - Liabilities |
Sage 50 automatically populates the fields in the Taxes - Benefits - Liabilities
columns with the default information specified when that employee's record was set up.
You can accept these values or change the details if required.
|
 |
The dollar value of the amount paid |
Sage 50 automatically calculates and displays the net amount paid to the employee.
|
 |
 Once you have entered the information in the Payroll Entry window, remember to
review your entries and click the Save icon to record the
salary payment, journalize the transaction and post it to the applicable accounts.
Once you have entered the information in the Payroll Entry window, remember to
review your entries and click the Save icon to record the
salary payment, journalize the transaction and post it to the applicable accounts.
|
Return to the top