Sales returns
When selling inventory to customers, sometimes things don't go quite as planned.
Occasionally, customers may return items of inventory for various reasons.
This topic explains where and how a sales return is recorded into your MYOB software.
Entering sales returns into your MYOB software involves two steps. First, a credit note is created
by creating an invoice with a negative amount in the Ship column. Next, the credit note is applied
to an existing sales invoice.
For this example we will create and then apply a credit note to
the following open sales invoice for the credit sale made to Footloose Dance Studio.
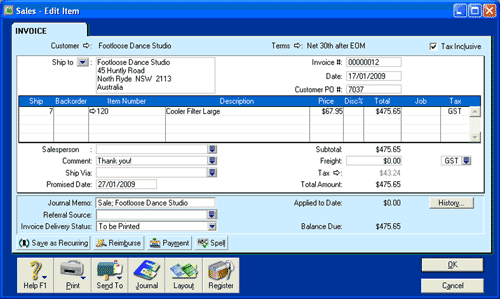
Creating the customer credit note
To create the customer credit note, start by opening the Sales Command Centre and
selecting Enter Sales.
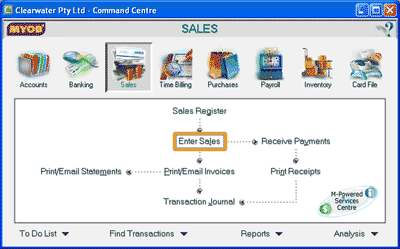
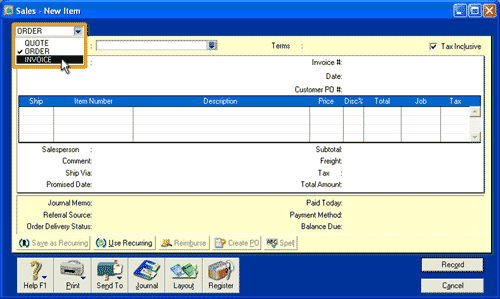
This displays the Sales - New Item window. In the top left hand corner of this window there is a
field from which you can choose QUOTE, ORDER, or INVOICE. If INVOICE is not already displayed in this field,
click the arrow next to this field and select INVOICE.

Helpful Hint!
If you are completing our software practice set
and the title of the window is not Sales - New Item, it is
because your MYOB software is displaying a different layout for that window. To change this to the Sales - New Item window,
click the Layout icon at the bottom of the window. In the Select Layout window that appears, select Item and
click the OK button. The title of the window should automatically change to Sales - New Item.
You should now notice that the colour of the window has turned blue, the colour your MYOB software uses
in the Sales - New Item window to indicate that
you are recording an invoice.
Remember, you enter the details of the sales return into your MYOB software as a negative amount in the Ship column in the invoice.
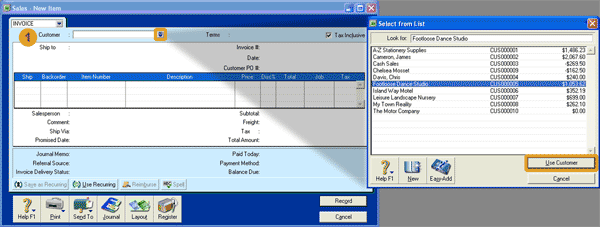
The following screenshots and reference table show step-by-step instructions on
how to enter a sales return into the Sales - New Item window.
Note that each step is assigned a
reference number to help you identify the appropriate field or icon in the
screenshots.
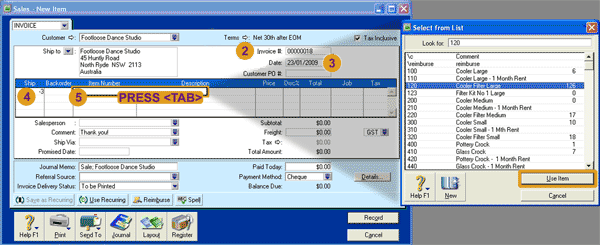
The Sales - New Item window with reference numbers
| Step |
MYOB software field or icon |
Action |
 |
Customer |
Click the search icon to open the Select From List window where you can select the customer
to which the sales return relates to. Click the Use Customer button to select the customer. Notice that
when you select the customer, your MYOB software automatically populates certain fields with
information about the customer that you entered when you added the customer into your MYOB software
during the setup process. You can accept that information or manually change it for this
sales return.
|
 |
Invoice # |
Accept the invoice number your MYOB software automatically assigns to this invoice or enter the invoice number you
wish to use. Note that the credit note (negative invoice)
should have an invoice number that is different from the original sales invoice
|
 |
Date |
Enter the date of the sales return.
|
 |
Ship |
Enter the number of inventory items returned as a negative number in this column.
|
 |
Item Number |
Enter the item number of the item of inventory returned. If you do not already know the item number,
click into this cell to select the cell. You should notice that a box appears around the cell.
You should then press <tab> on your keyboard to display the Select from List window
where you can scroll through the list of inventory items. Click on the appropriate item of inventory to select it
then click the Use Item button.
|
 |
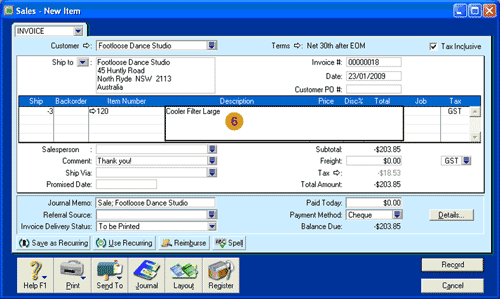
Description |
When you select the item of inventory using the Item Number field, your MYOB software automatically populates
this field with the longer description of the item of inventory. Read this description to
check that you have selected the correct item. Then press <tab> on your
keyboard to move to the next field.
|
 |
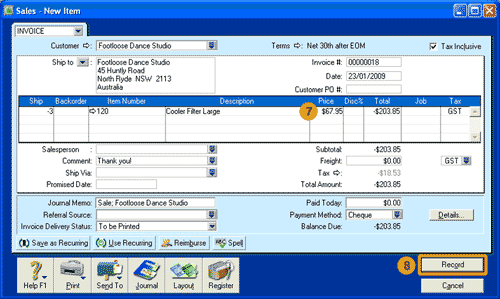
Price,
Total,
Tax
|
Your MYOB software automatically populates these fields using the default price
specified when that item of inventory was set up. Notice that the Total of the invoice is a negative number.
|
 |
Record button
|
Once you have reviewed the information entered for the sales return, remember to click the
Record button to record the sales return.
|
Applying the credit note to an outstanding invoice
Now that you have created the customer credit note by creating a negative invoice, the next step is to apply the
credit note to an outstanding invoice.
Helpful hint!
Note that credit notes can only be applied to an open sales order or invoice.
An open sales order is a sales order that has not yet been converted to a sales invoice.
An open invoice is an invoice that has not been paid in full by the customer. Once the customer has
paid the invoice, it is then considered to be a closed invoice.
In the Sales
Command Centre, select Sales Register.
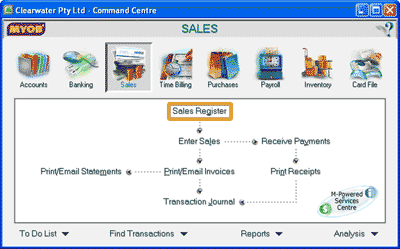
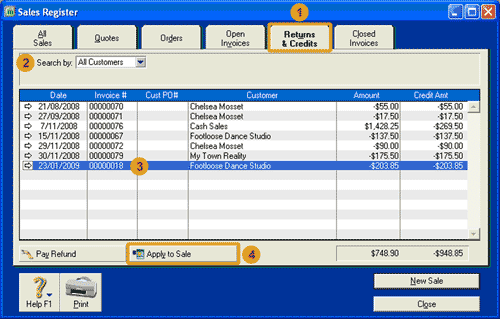
This opens the Sales Register window. The following screenshots and reference
table show step-by-step instructions on how to apply the
credit note to an outstanding invoice.
Note that each step is assigned a reference number to help you identify the appropriate
field or icon in the screenshots.
| Step |
MYOB software field or icon |
Action |
| Sales Register window
|
 |
Returns & Credits tab |
Click the Returns & Credits tab to be able to view the credit notes.
|
 |
Search by |
Select All Customers if you wish to display the credit notes for all customers. Select Customer
to view all credit notes for one specific customer. Note that if you choose Customer, an additional
drop down field will automatically be displayed. Click the search icon in this new field to display the
Select From List window where you can select the specific customer whose credit notes you wish to
view. Click the Use Customer button in the Select from List window to select that customer.
|
 |
Invoice # |
Locate the invoice number of the credit note you wish to apply to an open invoice and click on that
row to select it. The credit note should be highlighted in blue. |
 |
Apply to Sale |
Click the Apply to Sale button to open the Settle Returns & Credits window
where you can apply the selected credit note to an open invoice for that customer.
|
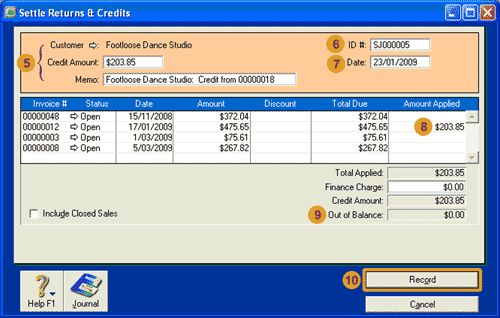
| Settle Returns & Credits window
|
 |
Various |
Notice that your MYOB software automatically displays the customer, credit amount and
a description (Memo) of the transaction. In the example given,
the Memo also includes the invoice number of the credit note, which is 00000018.
|
 |
ID #
|
Accept the identification number your MYOB software automatically assigns to this
sales return or enter the identification number you wish to use.
|
 |
Date |
Enter the date you wish to use to apply the credit note to the open invoice.
|
 |
Amount Applied column |
Find the invoice you wish to apply the receipt to and click in the cell in the Amount Applied column for
that invoice. Notice that your MYOB software then automatically populates this cell with the credit amount.
|
 |
Out of Balance |
This cell reports the difference between the amount in the Credit Amount field and the
Amount Applied column. Check that the out of balance amount is $0.00 otherwise you will not be able
to record the transaction. If you have just entered an amount in the Amount Applied column
you may need to click out of this cell before your MYOB software recognises the amount
you have entered into that field and automatically updates the Out of Balance field.
|
 |
Record |
Check that the details are correct and click the Record button to record
the sales return.
|
And just to double check...
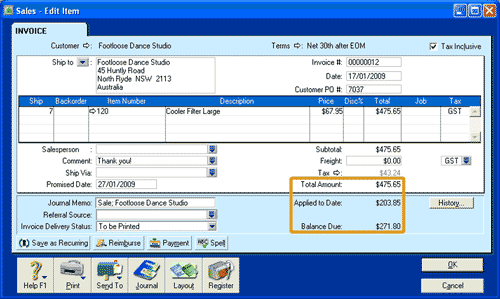
If you want to check that the credit note has been applied to the invoice, open the related invoice in your MYOB software.
For instructions on how to find transactions in your MYOB software, including how to open an invoice, see the
Find transactions page in this learning centre.
In the following screenshot notice that the amount of the credit note appears in the
Applied to Date line near the bottom of the window. The amount reported as Balance Due
has been updated to reflect that the
amount of the credit note has been subtracted from the Total Amount reported on the invoice.
The Sales - Edit Item window with the credit note applied to it
 Return to the top