Editing a transaction

Helpful Hint!
If you are completing the Sage 50 Practice Set
it is important that you follow the instructions provided in this topic so that you understand
how to fix recording errors in your Sage 50 data files if required.
While editing most transactions entered into Sage 50 is often straightforward, it may sometimes
appear that you are not able to change literally every field in certain transactions.
This is because Sage 50 restricts changes that can be made to certain fields in a
transaction when there are subsequent transactions applied to it (such as a
payment applied to an invoice) or that transaction has been converted to another
transaction (such as a sales order converted to a sales invoice).
This topic will show you some of the fields that Sage 50 restricts changes to,
and then takes you through
the steps to modify those restricted fields
using the sample company provided with
Sage 50 Complete Accounting.
Restricted fields
To learn the process of editing a restricted field,
let's open Sage 50 and explore Bellwether Garden Supply.
First, let's use the Sales Invoice List to open some invoices so we can see which fields are restricted
when a payment has been applied to the invoice. From the main menu, select Lists, then select
Customers & Sales then select Sales Invoices from the drop down list. Remember, additional
instructions about Sage 50 lists can be found in the Sage 50 lists
section of this learning center.
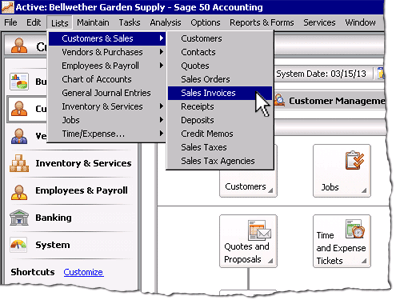
This opens the Sales Invoice List window where we can view a list of sales invoices
for the date range selected.
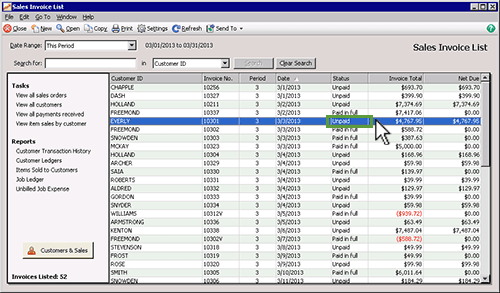
In the Status column, locate an invoice with the status of 'Unpaid' and open
that invoice by either double clicking it or selecting it in the list and clicking the open icon.
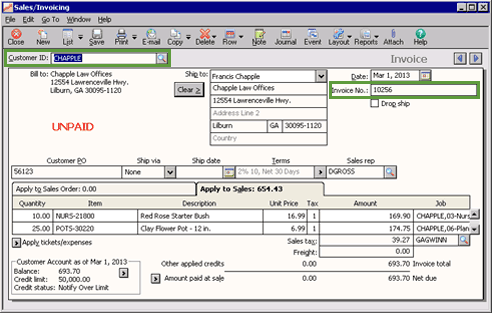
This opens the Sales/Invoicing window for that invoice.
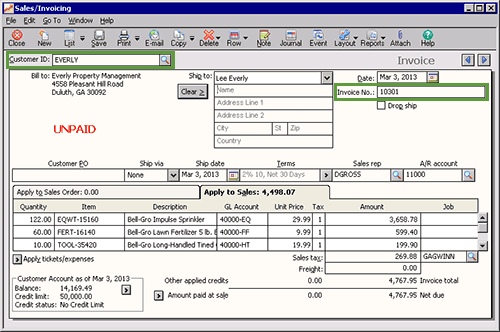
Notice that you
are able to change many details in the invoice. In particular you are able to
change the ID of the customer and the invoice number. You may like to prove this by changing these fields
yourself and clicking the save icon. Once you have done this, close the Sales/Invoicing window by clicking the close icon.
You will notice that Sage 50 updates the Sales Invoice list with your changes.
Next, let's investigate what happens to the Customer ID and Invoice No. fields
once a payment has been applied to an invoice. We will do this by amending an existing invoice
by adding a cash payment to it, saving it and then viewing the invoice again to
see the changes Sage 50 makes to the invoice once a payment has been applied to it.
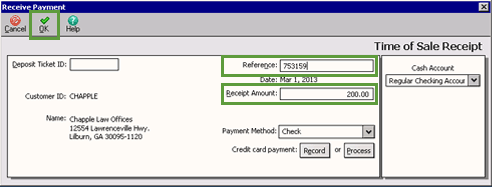
First, open an unpaid invoice
by double clicking it. Next, click the arrow to the left of the Amount Paid at Sale line item, or if you are using
Sage 50 Complete Accounting 2015 or 2017 click the Amount paid at sale hyperlink.
In the window that appears, enter the amount of cash received in the Receipt Amount field, and enter a reference number in the
Reference field. For example, if the customer paid by check, then the reference is the
check number of the customer's check. Click OK to save the information and close the window.
Notice how Sage 50 updates the invoice to display the amount paid at sale and also displays Partially Paid on the invoice.
Click Save to save the changes to the invoice, then close the Sales/Invoicing window.
Again, Sage 50 updates the Sales Invoice List with the changes.
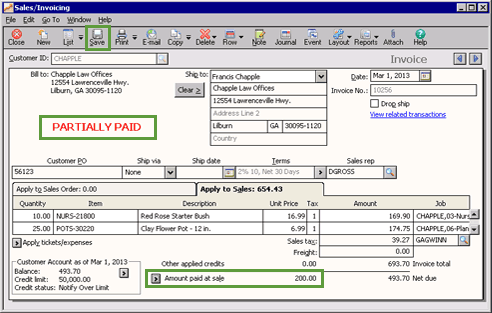
Now open that same invoice again by double clicking it in the Sales Invoice List.
Notice that the Customer ID and Invoice No. fields are now a light grey color.
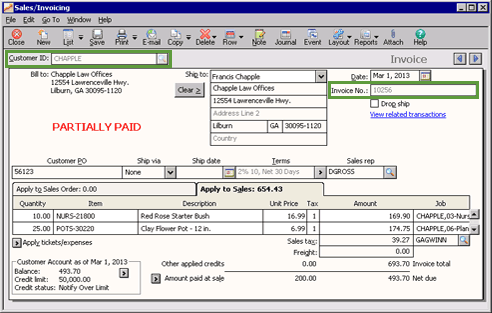
Try to change the Customer ID and Invoice No. fields.
You will notice that you are unable to do so. This is because Sage 50 restricts changes to
an invoice where a subsequent transaction has been applied to it. If you
do need to change these restricted fields, read on to find out how!
Modifying restricted fields
If you do wish to
change a restricted field in a sales invoice with a cash receipt applied to it, first you need to remove the
cash receipt that was
applied against that invoice and save the invoice. Then when you open the invoice again you
will be able to make changes to the invoice.
Once the change is made, you should then re-apply the cash receipt to the correct invoice.
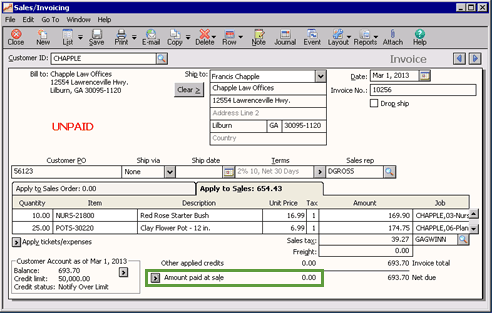
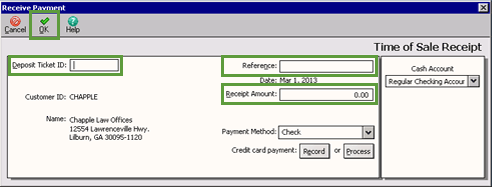
To delete the cash receipt that was applied at the time of the sale, open the invoice and click
the arrow to the left of the Amount Paid at Sale line item, or if you are using
Sage 50 Complete Accounting 2015 or 2017 click the Amount paid at sale hyperlink.
In the window that appears, we recommend that you carefully note down all of the details of the
transaction before deleting it. This is because you will need to re-enter the correct details
of this deleted transaction after modifying the incorrect sales invoice.
After you have a copy of the information in this window, delete the information in the
Receipt Amount, Reference and Deposit Ticket ID fields. Note that when you delete
the amount in the Receipt Amount field, Sage 50 automatically enters 0.00 into this field when you click out of the field.
Next, click OK to save the information and close the window.
You will notice in the invoice that you are still not able to change the Customer ID and Invoice No. fields.
This is because the changes need to be saved for Sage 50 to reflect the deleted cash receipt in the sales invoice.
Click the save icon and close the Sales/Invoicing window. Again, the Sales Invoice List will update
to reflect the changes.
Now open up the same invoice again by double clicking it in the Sales Invoice List.
Notice that once the receipt is deleted, the Customer ID and Invoice No. fields are no longer grey. This indicates that
you can now make changes to these fields that were previously restricted in the Sales/Invoicing window.

Make any amendments you need to make and then remember to click the save icon to save your changes.
Remember to re-enter the correct details of any deleted transactions
Remember that after making the required changes to the invoice, you still have to re-enter
the correct details of any deleted transactions. In this case, you need to
enter the amount paid at sale again by following the instructions above.
You can also visit the
Recording part cash part credit sales
section of this Learning Center for instructions on how to record the cash receipt from a customer at the time of the sale.
The
Collection of an accounts receivable
section of this Learning Center provides instructions on how to record the cash receipt from a customer
after the sale has been processed.
Now that we have covered the process of changing a restricted field in the Sales/Invoicing window, you should
be able to apply what you have learned here when required to modify restricted
fields in other types of transactions.
Return to the top