Sales transactions

Helpful Hint!
If you are completing the Sage 50 Practice Set,
be careful with the date you record as the invoice date. Remember, revenues should
be recorded when they are earned, which is generally considered when the items are delivered.
This means that the date of the sales transaction should match the date when the items are
delivered. When journalizing and posting the transaction from the sales invoice, Sage 50
records the date of the transaction as the date of the invoice (not the ship date). So make
sure you record the correct date when completing the Sales/Invoicing window!
One common task you will perform in Sage 50 is to enter details of sales transactions.
If you are completing the Sage 50 Practice Set, you are asked to record
sales transactions into the Sales/Invoicing window, which
is just like filling out a sales invoice. Sage 50 then uses
this information to record the journal entry to the sales journal and/or cash receipts journal,
and post the transaction to the appropriate general ledger accounts.
The balance of the customer's account is also automatically updated.
This topic demonstrates how to record different types of sales transactions,
from applying a sale to a sales order
to recording credit and cash sales (and everything in between!).
The following topics are covered:
Opening the Sales/Invoicing window in Sage 50
To open the Sales/Invoicing window in Sage 50, ensure you are in the Customers & Sales Navigation Center
in Sage 50. Click the Sales Invoices icon and select New Sales Invoice from the drop down list provided.
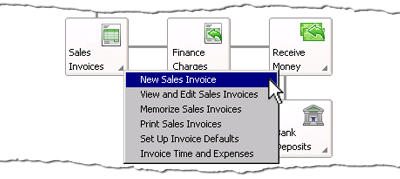
The Sales/Invoicing window then appears, where you are able to enter the details
of the sale. This topic first explains
how to enter common information in the Sales/Invoicing window.
The specific steps for each type of sale are then separately discussed
under the appropriate heading below.
Entering common details into a sales invoice
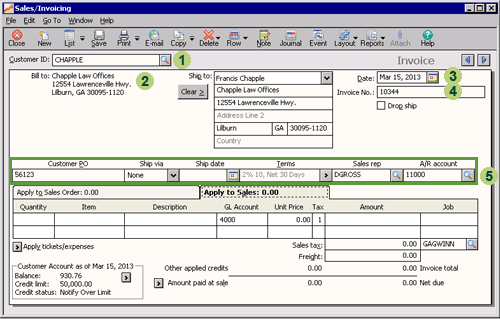
The following screenshot and reference table show step-by-step instructions on how to
record information from a sale into the top part of the Sales/Invoicing window.
These steps are common to all sales recorded using the Sales/Invoicing window.
Note that each step is assigned
a reference number to help you identify the appropriate field or icon in the
screenshot provided.
The Sales/Invoicing window with reference numbers - common steps
| Step |
Sage 50
field or icon |
Action |
 |
Customer ID |
Select the name of the customer.
|
 |
Bill To,
Ship To |
These fields are automatically populated when you select the customer. You can accept these default terms
or change the Ship To details if required.
|
 |
Date |
Click the calendar icon to select the date of the sales invoice.
Note that Sage 50 Complete Accounting 2015 and 2017
provide two date fields; one field for the invoice date
and a separate field for the due date of the invoice. If you are completing the
Sage 50 Practice Set you should enter the date of the transaction into
the Invoice Date field. Then calculate the due date of the invoice, which is due 30 days after the
date of the transaction, and enter this date into the Due Date field.
|
 |
Invoice No. |
If you leave the Invoice No. field blank, Sage 50 will not
automatically assign an invoice number when you save the invoice. However, Sage 50
will automatically assign an invoice number
to your invoice if the invoice is printed.
If you are completing the
Sage 50 Practice Set,
you are not asked to print invoices, only to save them. Instead, you are advised of
the invoice number to use, so you should enter that number into the Invoice No. field.
Even though Sage 50 will still journalize the sale without an invoice number,
it is still important that an invoice number is recorded for each invoice. This is because if the invoice
does not have an invoice number, you will not be able to apply the payment received from the
customer for that invoice. Additionally, you will not be able to record a credit memo for
invoices that do not have an invoice number.
|
 |
Various
|
Enter the customer's purchase order number in the Customer PO field if known.
The other fields are automatically populated when you select the customer.
You can accept the default terms or change the details if required.
|
top
Applying a credit sale to a sales order
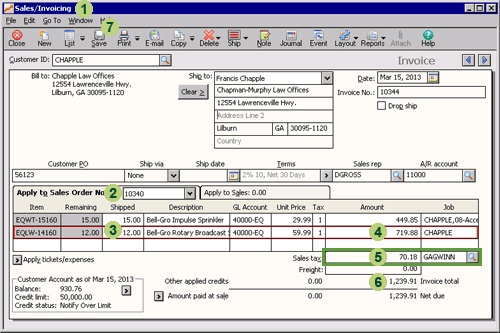
The following screenshot and reference table show step-by-step instructions on how to
record a credit sale to a customer based on a previous sales order made by that customer.
The Sales/Invoicing window - generating an invoice from a sales order
| Step |
Sage 50
field or icon |
Action |
 |
Sales/Invoicing window |
Open the Sales/Invoicing window and enter common details into the sales invoice
by following the five steps in the topic above,
Entering common details into a sales invoice.
|
 |
Apply to Sales Order No. |
If the selected customer has a sales order that is open (that is, the merchandise has not
been delivered to the customer yet) then the window displays the Apply to Sales Order No. tab rather than the
Apply to Sales tab. Here, in the drop down box next to Apply to Sales Order No.,
select the sales order number applicable to the sale.
The inventory items ordered will then appear in the rows.
|
 |
Shipped |
For each item ordered, enter the number of that item shipped to the customer.
|
 |
Amount |
Sage 50 automatically calculates the total amount of each type of item shipped to the customer.
|
 |
Sales Tax
|
Select the sales tax applicable to the sale. In the example above,
the sales tax selected is GAGWINN. Once the sales tax has been selected,
Sage 50 automatically calculates and displays the sales tax on the
invoice.
|
 |
Invoice Total
|
Sage 50 automatically calculates the total value of the invoice.
|
 |
 Once you have entered the information in the Sales/Invoicing window, remember to click the Save icon to
save the invoice,
journalize the transaction and post it to the applicable accounts.
|
Helpful hint!
Note that you can add additional items of inventory to the same sales invoice by clicking the
Apply to Sales tab and entering the details of those inventory items there. Sage 50 will add those
items to the invoice and recalculate the new total of the invoice to include the sales order items and
those additional items.
top
Recording credit sales
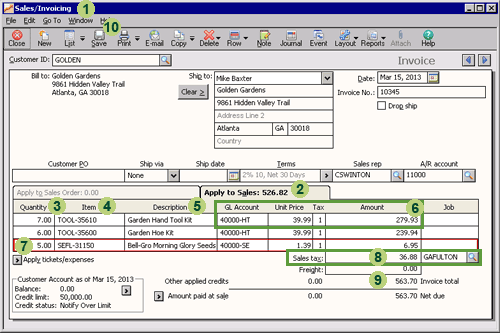
The following screenshot and reference table show step-by-step
instructions on how to record a new credit sale to a customer.
The Sales/Invoicing window - create an invoice for a credit sale
| Step |
Sage 50
field or icon |
Action |
 |
Sales/Invoicing window |
Open the Sales/Invoicing window and enter common details into the sales invoice
by following the five steps in the topic above,
Entering common details into a sales invoice.
|
 |
Apply to Sales |
Select the Apply to Sales tab to create a new invoice for a credit sale. Note that
if the selected customer has a sales order that is open (that is, the merchandise has not
been delivered to the customer yet) then the window displays the Apply to Sales Order tab
rather than the Apply to Sales tab. If this is the case you will need to click on
the Apply to Sales tab to record information for a new credit sale.
|
 |
Quantity |
Enter the number of units of the first inventory item sold.
|
 |
Item |
Type in the Item ID of the item of inventory sold.
|
 |
Description |
When you select the item of inventory using the Item field, Sage 50 automatically populates
this field with the longer description of the item of inventory.
Read this description to check that you have selected the correct item.
|
 |
GL Account,
Unit Price,
Tax,
Amount,
|
Sage 50 automatically populates these fields with the default information
specified when that item of inventory was set up. You can either accept the default information
or enter any changes directly into the appropriate field. Note that if you change the unit price, Sage 50
automatically calculates the new Amount of the item. Alternatively, if you change the total amount,
Sage 50 will calculate and update the Unit Price.
|
 |
New inventory row
|
You can enter additional items of inventory by repeating steps
3 to 6. If you need to add more rows than what is displayed,
click the Row icon near the top of the window and select Add from the drop down list provided.
|
 |
Sales Tax
|
Select the sales tax applicable to the sale. In the example above,
the sales tax selected is GAFULTON. Once the sales tax has been selected,
Sage 50 automatically calculates and displays the sales tax on the invoice.
|
 |
Invoice Total
|
Sage 50 automatically calculates the total value of the invoice.
|
 |
 Once you have entered the information in the Sales/Invoicing window,
remember to click the Save icon to
save the invoice,
journalize the transaction and post it to the applicable accounts.
|
top
Recording part cash part credit sales
The following screenshot and reference table show step-by-step instructions
on how to record a new sale to a customer that was only partly paid with cash.
The Sales/Invoicing window - recording a partial cash payment

| Step |
Sage 50
field or icon |
Action |
 |
Sales/Invoicing window |
Open the Sales/Invoicing window and enter common details into the sales invoice
by following the five steps in the first topic above,
Entering common details into a sales invoice.
Next, follow steps 2 to 9
from the previous topic, Recording credit sales.
Just make sure you do not save the invoice yet!
|
 |
Amount Paid at Sale |
Click the arrow to the left of the Amount Paid at Sale line item, or if you are using
Sage 50 Complete Accounting 2015 or 2017 click the Amount paid at sale hyperlink.
This opens up the following
window where details of the cash received are recorded.
|
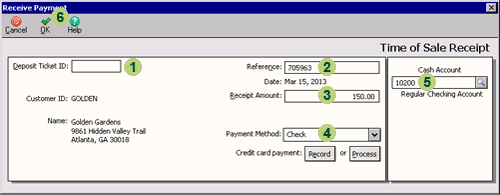
The following screenshot of the Receive Payment window was taken using
Sage 50 Complete Accounting 2013. If you are using
Sage 50 Complete Accounting 2015 or 2017, be aware that the name of the window
has changed to Receive Money. Apart from a few minor visual changes to the window,
the process
remains the same so you can still use these instructions to help you.
The Receive Payment/Money window - recording a partial cash receipt from a customer
| Step |
Sage 50
field or icon |
Action |
 |
Deposit Ticket ID |
Sage 50 may automatically populate a date or a reference number into the
Deposit Ticket ID field. If there is anything entered into the Deposit
Ticket ID field Sage 50 will
automatically create a bank deposit ticket for that single cash receipt
when the invoice is saved.
If this field is left blank, no bank deposit ticket is created. If you are
completing the
Sage 50 Practice Set, delete any entry that may be in this
field. This is because you are instructed to
record this cash receipt in a bank deposit ticket that is to be created later on.
|
 |
Reference |
Enter the reference number for the cash receipt. For example, if the customer paid by check,
then the reference is the check number of the customer's check.
|
 |
Receipt amount |
Enter the amount of the payment received.
|
 |
Payment Method |
Select the method of payment from the drop down list provided.
|
 |
Cash Account |
If the business has more than one type of cash account, select the cash account into which the
receipt of cash is entered.
|
 |
 Once you have entered and reviewed the information in the Receive Payment/Money window,
remember to click the OK icon to
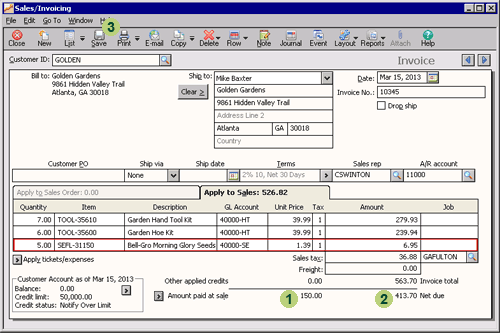
save the cash receipt. The Sales/Invoicing window then automatically updates
to include the cash received as shown in the screenshot that follows.
|
The Sales/Invoicing window - after recording the partial cash payment
| Step |
Sage 50
field or icon |
Action |
 |
Amount Paid at Sale |
The Amount Paid at Sale is automatically updated to display the amount of the payment made by the customer.
|
 |
Net Due |
The Sales/Invoicing window automatically calculates the amount of the invoice that the
customer is still required to pay.
|
 |
 Once you have reviewed the information in the Sales/Invoicing window, remember to click the Save icon to
save the invoice,
journalize the transaction and post it to the applicable accounts.
|
top
Recording cash sales with a sales invoice
The process to record a cash sale with a sales invoice is the same process as recording a part cash and part
credit sale. The only difference is that you record the full amount of the invoice in the Receive Payment window
rather than a partial cash payment.
Return to the top