Collection of an accounts receivable
Once you have made credit sales to customers,
the next step in the sales cycle is to collect the receivable from the customer.
There are two steps to this process:
recording the receipt of money from the customer, and then recording that the money has been
deposited in the bank. This topic covers the first step, showing
you where and how to record the receipt from the customer in Sage 50.
Instructions on how to perform the second step can be found in the
Creating a new bank deposit
page in the Banking section in this Learning Center.
Receive money from a customer
To record the receipt from a customer, open the
Customers & Sales Navigation Center. Click on the Receive Money icon and select Receive Money from Customer
from the drop down list provided.
Alternatively, through the Banking Navigation Center you can also access the same
Receive Money icon and select Receive Money from Customer from the drop down list provided.
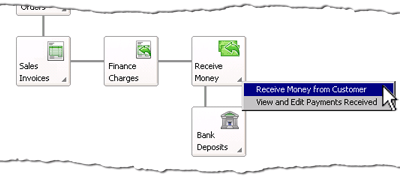
This opens the window where you can enter the details of the receipt into Sage 50.
The following screenshot and reference table show step-by-step instructions on how to enter the
collection of a receivable from a customer in Sage 50.
Note that each step is assigned a reference number to help you identify the
appropriate field or icon in the screenshot provided.
The following screenshot of the Receipts window was taken using
Sage 50 Complete Accounting 2013. If you are using
Sage 50 Complete Accounting 2015 or 2017, be aware that the name of the window
has changed to Receive Money. Apart from a few minor visual changes to the window,
the process
remains the same so you can still use these instructions to help you.
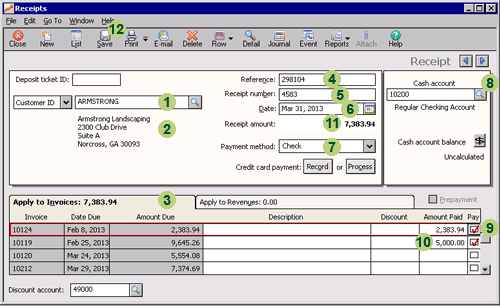
The Receipts/Receive Money window with reference numbers
| Step |
Sage 50
field or icon |
Action |
 |
Customer ID |
Select the name of the customer.
|
 |
Address |
Sage 50 automatically displays the address of the customer.
|
 |
Apply to Invoices tab |
Notice that Sage 50 automatically displays a list of the customer's outstanding invoices.
|
 |
Reference |
Enter the reference number for the cash receipt. For example, if the customer paid by
check, then the reference is the check number of the customer's check.
Note that this field is called Check/Reference No.
in Sage 50 Complete Accounting 2015 and 2017.
|
 |
Receipt Number
|
Enter the receipt number for the cash receipt.
|
 |
Date
|
Click the calendar icon to select the date of the receipt.
|
 |
Payment Method
|
Select the method of payment from the drop down list provided.
|
 |
Cash Account |
If the business has more than one type of cash account, select the cash account into which the
receipt of cash is entered.
|
 |
Pay column
|
If the customer has paid the full amount of the invoice, then click the Pay box for that invoice
to enter a check mark in that column.
Sage 50 automatically fills in the Amount Paid column with the amount due for that invoice.
Note that if the customer has more invoices than is displayed, Sage 50 provides a scroll bar
to scroll down to the invoice that you want to apply the payment to.
|
 |
Amount Paid column
|
If the customer only made a partial payment against a particular invoice, type in the amount of that payment
in the Amount Paid column. Sage 50 automatically places a check mark in
the box in the Pay column for that invoice.
|
 |
Receipt Amount
|
Sage 50 automatically calculates the total of the Amount Paid column and displays the
amount received from the customer. This amount is also displayed in the title of the
Apply to Invoices tab.
You should check that this total is equal to the amount of the
customer's check or other method of payment.
|
 |
 Once you have reviewed the information in the Receipts/Receive Money window, remember to click the Save icon to
record the cash receipt,
journalize the transaction and post it to the applicable accounts.
Once you have reviewed the information in the Receipts/Receive Money window, remember to click the Save icon to
record the cash receipt,
journalize the transaction and post it to the applicable accounts.
|

Helpful Hint!
When you open the Receipts/Receive Money window,
Sage 50 may automatically populate a date or a reference number into the
Deposit Ticket ID field. If there is anything entered into the Deposit
Ticket ID field Sage 50 will automatically create a bank deposit ticket for that single cash receipt
when the window is saved.
If this field is left blank, no bank deposit ticket is created. If you are
completing the
Sage 50 Practice Set, delete any entry that may be in this
field. This is because you are instructed to
record this cash receipt in a bank deposit ticket that is to be created later on.
See the
Creating a new bank deposit
page in the Banking section in this Learning Center for instructions on how this is done.
Return to the top