Entering information into Sage 50
There are many ways to enter information into Sage 50. Now that you are familiar with the Sage 50 main
window and parts common to many Sage 50 windows, let's learn how
to you use the mouse and keyboard to perform the following activities:
Move the cursor forward and backward
In addition to using the mouse to move the cursor from one field to another, you can use the keyboard
to move the cursor forward and backward in Sage 50. Many accountants prefer to use the keyboard
because it causes the cursor to move consecutively through all of the fields in a window. Users
are therefore less likely to make mistakes or omit details when entering information into Sage 50.
Ensure that Sage 50 is open in your computer, then open any Sage 50 window and
practice using your keyboard move the cursor through different fields:
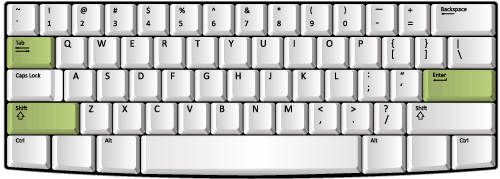
- To move the cursor to the next field in a Sage 50
window, press <Tab> or <Enter>.
- To go back to the fields that have been skipped or entered, hold down the <Shift> key
and press either <Tab> or <Enter>.
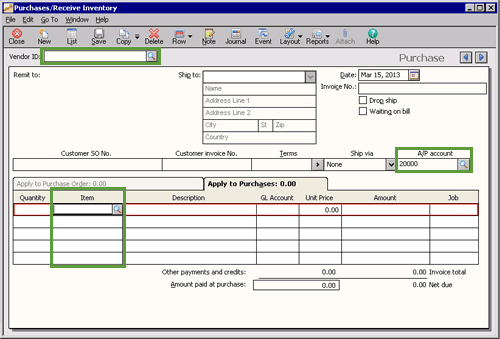
When you open a Sage 50 window, some fields may have a magnifying glass icon next to them
such as the Vendor ID field, the A/P Account field and the Item field in the screenshot below. To enter information
into those fields, you must select a record from a drop down list of records
that have previously been created in Sage 50. If you enter information that is not in that list,
Sage 50 will not allow you to save the information in that window. If you do try to
save the information in that window, Sage 50 will prompt you to set up that item so that
you can select it from the drop down list for that field.
So all records must be created
before they can be selected in a Sage 50 field with a lookup icon. You will learn how to create records in
later sections of this Learning Center. For now, just be aware that in the
fields that have a magnifying glass icon, you can only select a record
from the drop down list of existing records.
Below is a list of various ways you can use to locate and select a record in the fields with a magnifying
glass icon:
- Click on the magnifying glass icon to open a drop down list of existing records
that have been set up in Sage 50. Scroll down the list and click on a record to
select it.
- With the cursor in the field that has a magnifying glass icon, click the right button
of your mouse. This will open the same drop down list from which you can choose a record.
- With the cursor in the field that has a magnifying glass icon,
type ?. Again, this will open the same drop down
list from which you can select a record.
- Type the short identification code of the record you are looking for in the field that has a
magnifying glass icon.
As you start typing, a drop down list of existing records
appears. Once the name of the record is
highlighted, you can either press <Tab> or
<Enter> on your keyboard or select the
appropriate record with your mouse.
Add extra lines to record information in a Sage 50 window
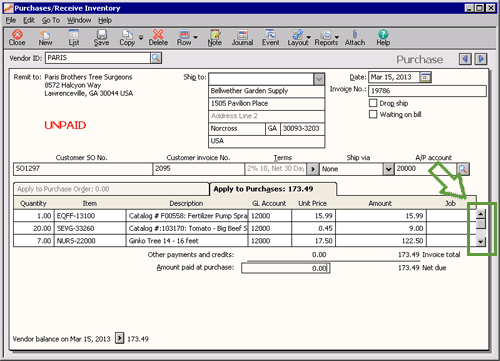
When you open a Sage 50 window, it may display a limited number of lines
in which you can record the required information. Sometimes you may need additional
lines because you have more items to enter than there are lines displayed.
To add extra lines to a Sage 50 window:
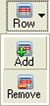
- Click the Row toolbar icon and then from the options presented, click Add.
- Place the cursor in the field of the last row in which
you have entered information and press <Tab> or
<Enter> on your keyboard.
A new line will appear in which you can enter additional information.
- Resizing the window to make it bigger will also display additional lines.
Notice that if you have entered more items than can be dispayed in a window,
a scroll bar appears on the right side of the window to allow
you to scroll through the list of items recorded.
 Return to the top