Recording a miscellaneous cash receipt
Besides collecting receipts from customers, businesses sometimes receive miscellaneous
cash receipts from parties
such as loan providers, from vendors for cash refunds and from the owners of
the business for further capital investment. If you are completing
the Peachtree Practice Set, you are asked to
enter those miscellaneous receipts into the Receipts window. Peachtree will then
use the information saved in that window to record the journal
entry to the cash receipts journal and post the transaction to
the appropriate accounts.
This topic explains where and how to
record a miscellaneous cash receipt in Peachtree.
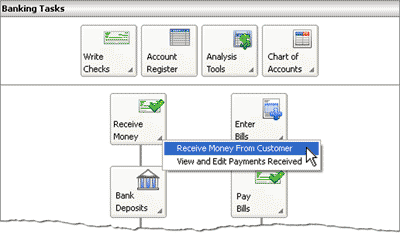
To record the miscellaneous receipt, if you are in the
Banking Navigation Center, click the Receive Money icon and select
Receive Money from Customer from the drop down list provided.
Alternatively, through the Customers & Sales Navigation Center,
you can also access the same Receipts window by clicking
the Receive Money icon and selecting Receive Money from the drop
down list provided.

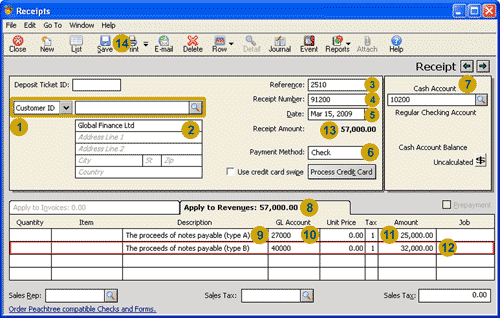
This opens the Receipts window where you are able to enter the details of the receipt.
The following screenshot and reference table show step-by-step instructions on
how to enter the miscellaneous cash receipt into the Receipt window in Peachtree.
Note that each step is assigned a reference number to help you identify the
appropriate field or icon in the screenshot of the Receipts window.
The Receipts window with reference numbers

| Step |
Peachtree
field or icon |
Action |
 |
Customer or Vendor ID |
The options you should select depends on from whom the cash is received:
- If the receipt is from an existing vendor, select Vendor ID and then click the
magnifying glass icon to select the appropriate vendor ID.
- If the receipt is from an existing customer, select Customer ID and then click
the magnifying glass icon to select the appropriate customer ID.
- If the receipt is from a party that is not set up as a vendor or a customer in Peachtree,
select Customer ID but leave the field with the magnifying glass icon empty.
|
 |
Name and address |
Note that if you select an existing customer or vendor, Peachtree automatically
displays the name and address of that customer or vendor.
However, if
you are completing the Peachtree Practice Set, you may be provided
with the name of the party from whom the payment is received but not
their address. In this case, just type the payer's name in the
Name line. |
 |
Reference |
Enter the reference number for the cash receipt. For example, if you receive
a check, then the reference is the check number of that check.
|
 |
Receipt Number |
Enter the receipt number for the cash receipt.
If you are completing the Peachtree Practice Set, you are
advised of the receipt number to use, so you should enter that number into
the Receipt Number field.
|
 |
Date
|
Click the calendar icon to select the date of the receipt.
|
 |
Payment Method |
Select the method of payment from the drop down list provided.
|
 |
Cash Account |
If the business has more than one type of cash account, select the cash account into which the receipt of cash is entered.
|
 |
Apply to Revenues tab |
Select the Apply to Revenues tab to enter the details of the receipt. Note that
if the miscellaneous receipt is from an existing customer who has not
paid the full amount outstanding on their account,
Peachtree automatically displays the Apply to Invoices tab
rather than the Apply to Revenues tab. If this is the case you will
need to click on the Apply to Revenues tab to record information for a
new cash receipt.
|
 |
Description
|
Enter the description of the miscellaneous cash receipt.
|
 |
GL Account
|
Select the appropriate general ledger account that should be credited
after you save this receipt in Peachtree. Note that
when you first open the Receipts window, Peachtree may automatically
display the default general ledger sales account. Remember to select
the correct account that needs to be credited by the amount of the receipt.
|
 |
Amount
|
Type in the amount of the receipt in the Amount column.
|
 |
New receipt row
|
You can enter additional receipts by repeating steps 9 to 11.
|
 |
Receipt Amount
|
Peachtree automatically calculates and displays the total amount received.
This amount is also displayed in the title of the Apply to Revenues tab.
You should check that this total is equal to the amount of the check received or
other method of payment.
|
 |
 Once you have reviewed the information in the Receipts window, remember to
click the Save icon to record the cash receipt, journalize the transaction
and post it to the applicable accounts.
|
Return to the top