Recording a purchase order

Helpful Hint!
If you are completing our software practice set,
purchase orders are to be recorded in the Purchases - New Item window
by selecting the ORDER option in the top left hand corner of that window.
The purchase order is to be converted to a bill when the inventory is received.
One of the first steps in the purchases cycle is placing an
order with a supplier. In general, you can record this event in two different ways.
One way is to create a purchase order
and then to enter the supplier's invoice (bill) into your MYOB software
when the items of inventory are received.
Alternatively, if the items are to be received immediately, the second way
is to not create a purchase order and to just enter the supplier's bill
for the purchase.
The method chosen does have consequences as to when your MYOB software records the
information from the purchase into the general ledger accounts. The general ledger
accounts are updated when the purchase bill is saved, not when the purchase order
is saved. When the purchase order is saved, your MYOB software records the purchase order
information into the Purchases Register - Orders tab. Entries in the Purchases Register - Orders
tab are not posted to the general ledger accounts. It is only when the purchase order is
converted to a credit purchase (and a bill is created and saved) that the
general ledger accounts are updated to reflect the number of items received.
You can learn how to convert a purchase order to a credit purchase (and how to view
the purchase orders in the Purchases Register - Orders tab) in the
Purchase transactions
page in this learning centre.
Purchase orders are useful to be able to track future expenses.
You can also use the purchase order functionality to track how much of the inventory you have
received and how much is still on order. This topic shows you where and how to enter
purchase order information into your MYOB software.
To record a purchase order, open the Purchases Command Centre and select Enter Purchases.
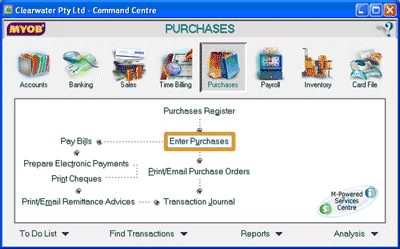
This displays the Purchases - New Item window. Notice in the top left hand corner of this window there is a
field that in this example currently says BILL.
Click the arrow next to this field and select ORDER.
Helpful Hint!
If you are completing our software practice set
and the title of the window is not Purchases - New Item, it is
because your MYOB software is displaying a different layout for that window.
To change this to the Purchases - New Item window,
click the Layout icon at the bottom of the window.
In the Select Layout window that appears, select Item and
click the OK button. The title of the window should automatically change to Purchases - New Item.
You should now notice that the colour of the window has turned from blue to yellow. It is here
where you can enter the details of the purchase order into your MYOB software.
The following screenshots and reference table show step-by-step instructions on
how to enter a purchase order into the Purchases - New Item window.
Note that each step is assigned a
reference number to help you identify the appropriate field or icon in the
screenshots.
| Step |
MYOB software field or icon |
Action |
 |
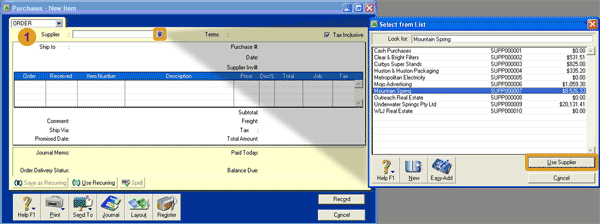
Supplier |
Click the search icon to open the Select from List window where you can select the supplier
to which the order relates to. Click the Use Supplier button to select the supplier. Notice that
when you select the supplier, your MYOB software automatically populates certain fields with
information about the supplier that you entered when you added the supplier into your MYOB software
during the setup process. You can accept that information or manually change it for this
purchase order.
|
 |
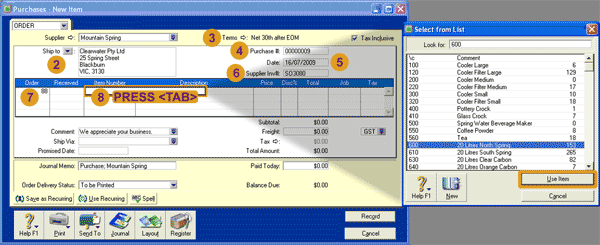
Ship to |
This field is automatically populated with the name and address of your business
that you entered when you set up your company file.
|
 |
Terms |
This field is automatically populated when you select the supplier. You can accept this information
or change it for this purchase order by clicking on the zoom arrow. |
 |
Purchase # |
Accept the purchase number your MYOB software automatically assigns to this purchase order
or enter the number you wish to use.
|
 |
Date |
Enter the date of the purchase order.
|
 |
Supplier Inv#
|
Enter the supplier's invoice number in the Supplier Inv# field if known.
|
 |
Order |
Enter the quantity of the first item ordered.
|
 |
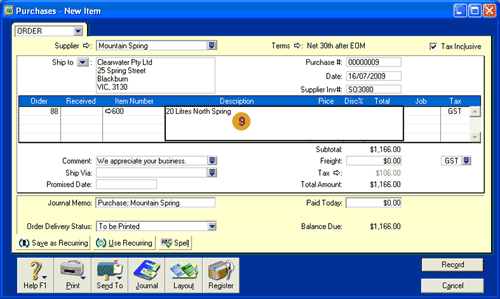
Item Number |
Enter the item number of the item of inventory ordered. If you do not already know the item number,
click into this cell to select the cell. You should notice that a box appears around the cell.
You should then press <tab> on your keyboard to display the
Select from List window
where you can scroll through the list of inventory items. Click on the
appropriate item of inventory to select it,
then click the Use Item button.
|
 |
Description |
When you select the item of inventory using the Item Number field, your MYOB software
automatically populates
this field with the longer description of the item of inventory. Read this description to
check that you have selected the correct item. Then press <tab> on your
keyboard to move to the next field.
|
 |
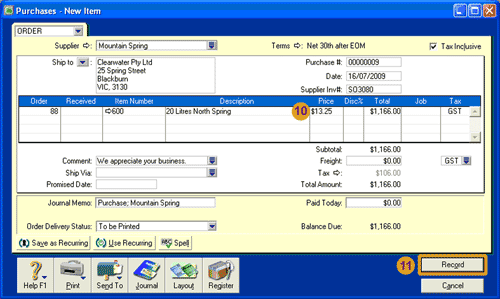
Price,
Total,
Tax
|
If you have purchased this item before, your MYOB software automatically populates
the price field with the last price paid for that item of inventory. You can either accept this price
or enter a new price into this field.
Note that if you change the price, your MYOB software
automatically calculates the new Total for that number of items. Alternatively you can change
the amount recorded in the Total column and
your MYOB software will calculate the percentage discount and record it in the Disc% column.
If this is the first time you are purchasing that type of inventory, enter the price of one
unit of that inventory item into the price field. Your MYOB software automatically calculates the
total for that number of items.
Your MYOB software automatically populates the Tax column with the default information
specified when that item of inventory was set up.
|
| Helpful hint!
|
You can enter additional items of inventory ordered by repeating steps
7 to 10 in a new row.
|
 |
Record button
|
Once you have reviewed the information entered for the purchase order, remember to click the
Record button to record the purchase order.
|
Return to the top