Add an item of inventory
Before you are able to record transactions relating to inventory,
you first need to set up your inventory items in your MYOB software. This topic shows you how to add
an inventory item into your MYOB software, and how to modify or delete an item of inventory
should the need arise.
Add an item of inventory
Adding an item of inventory into your MYOB software is completed through the Inventory Command Centre. In the flowchart
section of this command centre, click Items List.
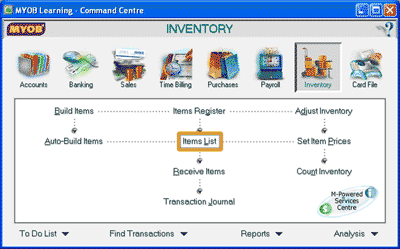
This opens the Items list window.
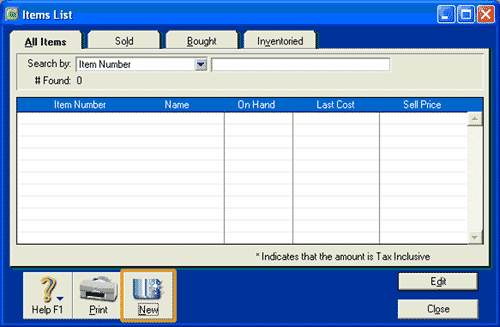
Notice that there are no items displayed in this list. To add an item, click the New icon. This opens the
Item Information window where you are able to enter the details of the inventory item into your MYOB software.
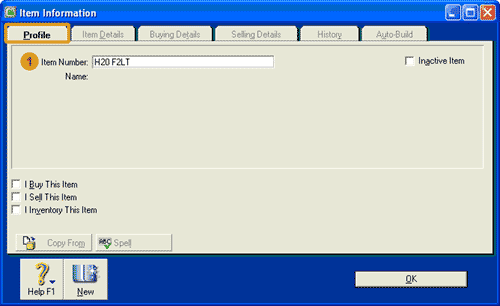
The following screenshots and reference table show step-by-step instructions on how to add
an item of inventory into the Item Information window in your MYOB software. Note that each step is
assigned a reference number to help you identify the appropriate field or icon in the screenshots.
| Step |
MYOB software field or icon |
Action |
| Profile Tab |
 |
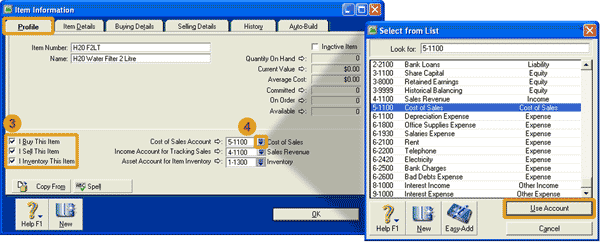
Item Number |
Enter the item identification number. This may be a number or a mixture of numbers and letters.
You should notice that you are unable to record other information into this window, such as the
name of the item. To reveal the next input field,
you need to press <tab> on
your keyboard after entering in the item number.
|
 |
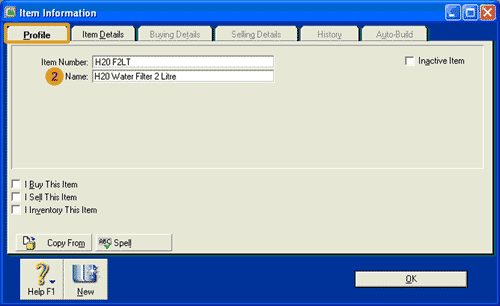
Name |
Enter the name or a description of the item of inventory.
|
 |
Tick Boxes
|
Select whether you buy, sell and/or inventory the item. Notice that as you tick each item,
to the right of the item, a line automatically appears where you are able to select an account
relating to the item you have ticked.
Helpful Hint: If you are completing our
software practice set
please be aware that when you tick the I buy This Item box, the
line that first appears is called Expense Account for Tracking Costs.
It is only when you tick all three
boxes that this line automatically changes to Cost of Sales Account, which is what you
are required to record if completing the practice set.
|
 |
Account Selection |
For each box that you ticked in step 3 above, click the search icon
in the adjacent field to open the Select from List window
where you can select the account you wish to use for that item.
|
| Buying Details Tab |
 |
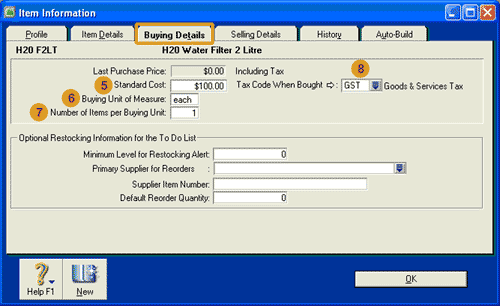
Standard Cost |
Enter the standard cost of the item of inventory.
|
 |
Buying Unit of Measure |
Enter a description of how you buy your items. For example, you may purchase items individually,
in which case you should write 'each' in this field. Alternatively, you may purchase your items by
the case or a box, in which case you may write 'case' or 'box' in this field.
|
 |
Number of Items per Buying Unit |
Enter the number of items contained in a buying unit specified in the Buying Unit of Measure field above. For example,
if you specified 'each' as the buying unit of measure, there is only one item per buying unit, so
you enter 1 in the Number of Items per Buying Unit field. Alternatively,
if you purchase a box of 12 items, then enter 12 in this field.
|
 |
Tax Code When Bought |
Enter the tax code applicable to the item purchased. This code is the default code that appears
when you select this item in the Purchases window.
|
| Selling Details Tab |
 |
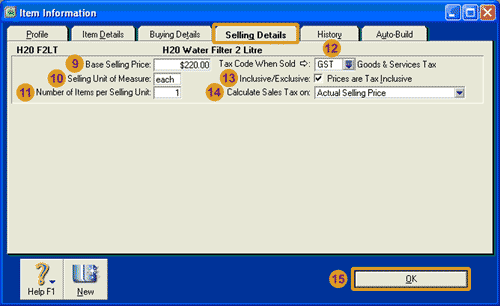
Base Selling Price |
Enter the selling price for the item. The selling price is based on the selling units of measure
that you specify in the next field. So if you sell items individually the selling price should
be for one item. However, if you sell the inventory as a box of 12, you should enter the selling
price for one box.
|
 |
Selling Unit of Measure |
Enter a description of how you sell your items. For example, you may sell items individually,
in which case you should write 'each' in this field. Alternatively, you may sell your items by
the case or a box, in which case you may write 'case' or 'box' in this field.
|
 |
Number of Items per Selling Unit |
Enter the number of items contained in a selling unit as specified in the Selling Unit of Measure field
above. For example,
if you specified 'each' as the selling unit of measure, there is only one item per selling unit, so
you enter 1 in the Number of Items per Selling Unit field. Alternatively,
if you sell a box of 12 items, then enter 12 in this field.
|
 |
Tax Code When Sold |
Enter the tax code applicable to the item for sale. This code is the default code that appears
when you select this item in the Sales window.
|
 |
Inclusive/Exclusive |
Tick this box if the selling price specified in the Base Selling Price field includes tax.
If the selling price did not include tax, leave this box unticked.
|
 |
Calculate Sales Tax on |
Select whether you wish for your MYOB software to calculate your tax based on the base selling price specified in this window,
or the actual selling price you specify when recording the sale in the Sales window.
|
 |
OK button |
After you have checked all the information for the inventory item is correct, remember to
click OK to save the inventory record.
|
You should then notice that the inventory item you have just created
appears in the Items List. Click the New icon if you wish to add another item of Inventory,
otherwise click the Close button to close the Items List window.
Enter the opening balances of inventory items
If you are transferring your existing accounting records from another accounting system into
your MYOB software for the first time, after adding your inventory items into the software
you will also need to enter the
beginning balance of each item of inventory.
Entering the opening balance of each inventory item into your MYOB software is completed
through the Inventory Command Centre.
In the flowchart section of this command centre, click Count Inventory.
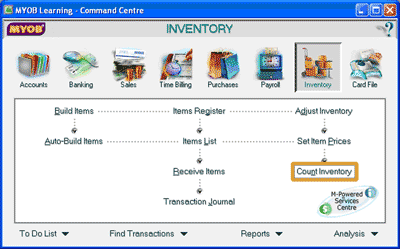
This opens the Count Inventory window where you enter the number of each inventory item on hand in
the Counted column. As you enter these numbers, notice that your MYOB software automatically updates the Difference
column to display the difference between the number in the On Hand column and the number in the
Counted column.
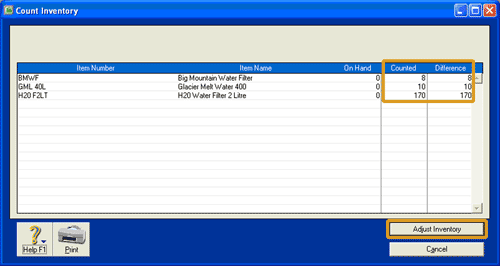
Click the Adjust Inventory button. This opens the Adjustment Information - Default Expense Account window.
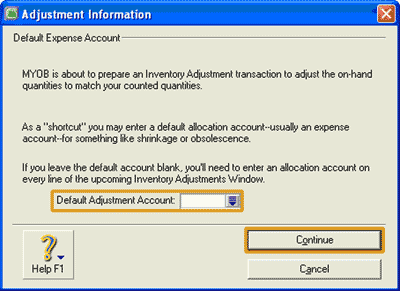
Since we are entering the opening balances of the inventory items you are not required to
select anything in the Default Adjustment Account field. Click the Continue button to open the
Adjustment Information - Opening Balance Check window.
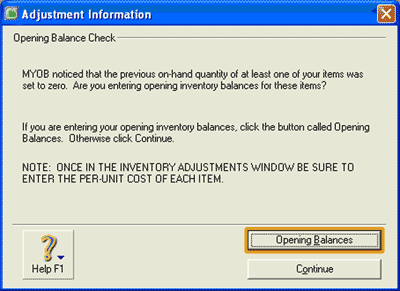
Click the Opening Balances icon. This opens the Adjust Inventory window.
The following screenshot and
reference table show step-by-step instructions on how to enter the opening balance of an inventory item
into the Adjust Inventory window in your MYOB software. Note that each step is assigned a
reference number to help you identify the appropriate field or icon in the screenshot.
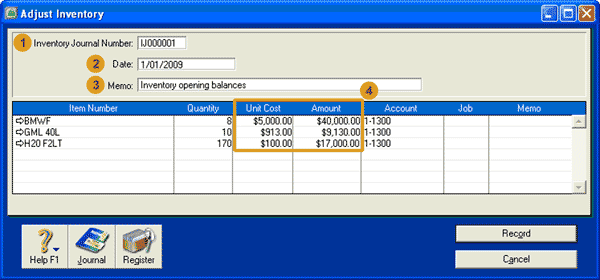
| Step |
MYOB software field or icon |
Action |
|
Inventory Journal Number |
Accept the default journal number automatically displayed or enter your preferred journal number.
|
|
Date |
Enter the date. Since this is recording the opening balances of your inventory items, it may help to
enter the first day of your conversion month in this field.
|
|
Memo |
Accept the default description automatically displayed in this field, or enter a new one
that is meaningful to you, such as Inventory opening balances.
|
|
Unit Cost column |
Enter the unit cost of each item in the list. Note that this is the amount that you paid for
each item. Notice that after you enter the unit cost, your MYOB software automatically
updates the Amount column with the
total value of that type of inventory item (Quantity x Unit Cost).
|
| Warning! Before clicking the
Record icon in the Adjust Inventory window, you should double check that the total value of inventory
entered into this window is equal to the total balance of the Inventory account that you entered
when entering the opening balances of your accounts. Read on to find out how!
|
Before clicking Record in the Adjust Inventory window, use a calculator to calculate the total of the Amount column.
In this case the total is equal to $40,000 + $9,130 + $17,000 = $66,130.
To check that this $66,130 is the opening balance of the Inventory account recorded earlier, open the
'Enter your opening balances' window in the Accounts Easy Setup Assistant.
- From the main menu bar, select Setup then Easy Setup Assistant.
- In the Easy Setup Assistant window that opens, click the Accounts icon.
- In the Accounts Easy Setup Assistant window, click Opening Balances in the list.
- In the 'Enter your opening Balances' window, find the Inventory account in the list
and check that the balance entered is equal to the amount you calculated earlier,
which in this case was $66,130.
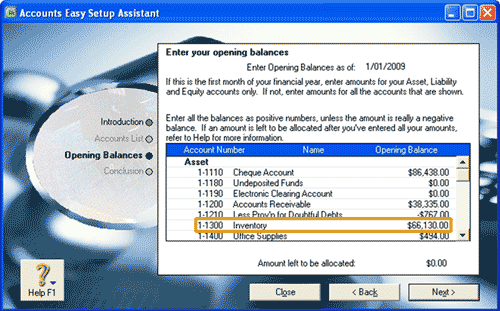
Once you have checked that the balances are equal you can close the Accounts Easy Setup Assistant.
But most importantly, ensure that you click Record in the Adjust Inventory window
to record the opening balances of your inventory items into your MYOB software.
top
Modifying or deleting inventory records
After you have set up your inventory records you may need to alter the information
recorded in them.
Or you may find that you need to delete
an inventory record for some reason. Read on to find out how to modify or delete
an inventory record.
Modifying inventory records
In order to modify the inventory record you simply open the
Item Information window for that item of inventory,
make the required changes, and click OK.
But how do you open the Item Information window for a particular item of inventory?
This is completed in the Inventory Command Centre.
- In the flowchart section of the Inventory Command Centre, select Items List to open the Items List window
- Double click the name of the inventory item to open the Item Information window for that item
of inventory where you
can modify the record. Alternatively, highlight the name of the inventory item in the Items List window
by clicking on it, and then click the Edit button to open the same Item Information window.
Deleting inventory records
To delete an inventory record in your MYOB software, follow the steps above to open the
Item Information window for that item of inventory.
Once open, select Edit then Delete Inventory Item from the menu bar.
Note that you will not be able to delete an inventory record if any transactions
have been applied to that item of inventory.
This includes if you have entered an opening balance for that item of inventory.
To delete such a record, you need to delete the transactions applied to it before the record can be deleted.
However, if you have transactions or an opening balance
recorded for an inventory record that you want to delete, you really should be questioning whether you
should be deleting that inventory record in the first place!
Return to the top