Modifying the chart of accounts
When you created your company data file, Peachtree automatically created a chart of accounts
based on the business type selected in the Create a New Company wizard. While many of these accounts
will exactly match your business needs, others may not. You may find that you need to do one or
more of the following:
While you almost certainly will need to tailor the chart of accounts to your business after you
set up your company in Peachtree, you may also need to alter the chart of accounts as your
business needs change. For example, your business may take out a long-term loan
and needs to create a new account to record the details of the loan.
This topic shows you how to add, modify and delete a general ledger account from the chart of accounts.
Add a new general ledger account
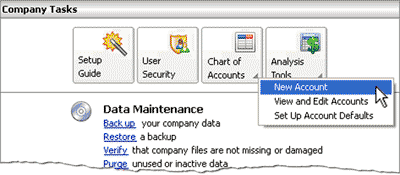
To add a new general ledger account into Peachtree, open up the Company Navigation Center. Click the
Chart of Accounts icon and select New Account from the drop down list provided.

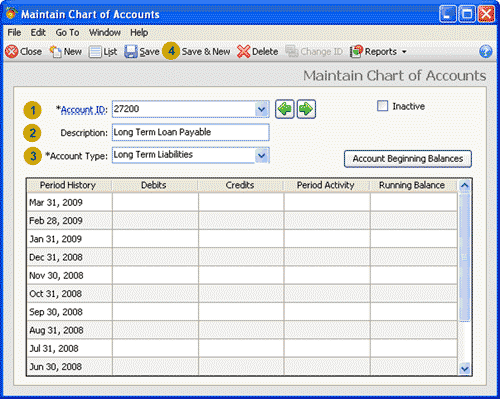
This displays the Maintain Chart of Accounts window where you can enter the details of the
new account into Peachtree. The following screenshot and reference table show step-by-step
instructions on how to enter a new account into the Maintain Chart of Accounts window in Peachtree.
Note that each step is assigned a reference number to help you identify the
appropriate field or icon in the screenshot.

| Step |
Peachtree
field or icon |
Action |
 |
Account ID |
Carefully type the unique account number of the new account you are creating.
You should verify that the account number does not already exist in the chart of
accounts in Peachtree otherwise you may accidentally alter another account. Peachtree helps you check this
by displaying a drop down list of existing accounts and highlights the first
account starting with the numbers you enter as you type. Once you enter a new unique account number
no existing account should be highlighted in this list.
Once you have checked your account number is correct,
move to the next step by clicking the OK icon at the bottom of the drop down list or pressing
<Tab> or <Enter> on your keyboard.
|
 |
Description |
Enter the name of the new account you are creating.
|
 |
Account Type |
Select the class of the account from the drop down list provided. It is important that you select the
correct classification so that the balance of the account is reported in the correct line in the financial
statements.
|
 |
 Once you have entered the information in the Maintain Chart of Accounts window, remember to
review your entries and save the new account by clicking the Save icon.
|
top
Modifying or deleting an account
When setting up your chart of accounts, sometimes there might be a default account that
would be perfect for your business if only the description of the account
was slightly different. Instead of deleting the account and adding
a new one, you are able to modify the existing account to suit your business.
You may also find that the chart of accounts contains default accounts that
you do not plan to use in your business. To minimize the number of accounts that you have to manage
you can delete these accounts that are not used in your business.
To modify or delete an account you need to open that account in the Maintain Chart of Accounts window.
In the Company Navigation Center, click the Chart of Accounts icon and select New Account from the drop down list provided.
This displays the Maintain Chart of Accounts window where you can enter the Account ID of the
account you wish to modify or delete.
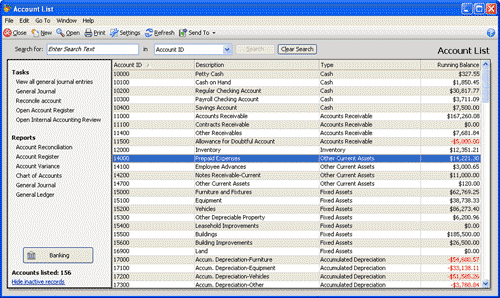
Alternatively you can click the Chart of Accounts icon and select
View and Edit Accounts from the drop down list provided.
This displays the Account List window below.

You can then scroll down the list until you find the account you are looking for. However, if there are a
large number of accounts in the list, you may wish to use the the Search function to
filter the accounts displayed. Once you have found the account, double click it to open that account in the
Maintain Chart of Accounts Window. You are then able to modify or delete the account as described below.
Modify an existing account

To modify an existing account you need to open that account in the Maintain Chart of Accounts window.
There you can change the Account ID by clicking the Change ID icon, entering the new Account ID number
and clicking OK. You can also
alter the name of the account by amending the Description field, or you can change the
account classification using the drop down menu of the Account Type field.

Once
you have made your changes to modify the account, remember to click Save to save your changes.
Delete an account

To delete an account from the chart of accounts you need to open that account in the
Maintain Chart of Accounts window. Once open, click the Delete icon.
You will be asked 'Are you sure you want to delete this record?' Clicking Yes will delete that
account from the chart of accounts. Notice that once you close the Maintain Chart of Accounts window,
if you also have the Account List window open, Peachtree will automatically update the account
list to remove the deleted account.
Having trouble deleting an account?

Helpful Hint!
If you are completing the Peachtree Practice Set,
you will need to follow these instructions to delete an account that
has been assigned to the default settings of your inventory items.
If you are having trouble deleting an account, it may be that you are trying to delete an account that
has been assigned to the default settings of your inventory items. In order to delete such an account
you need to first remove that account as a default account assigned to your inventory items.
To remove the account from the default settings of your inventory items, open the
Inventory & Services Navigation Center. Click the Inventory Items icon and select
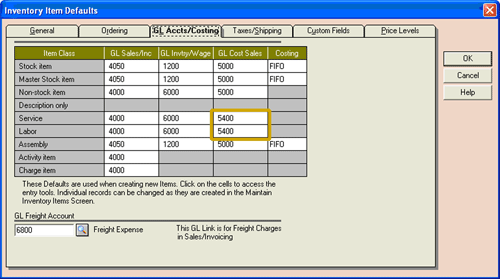
Set Up Inventory Defaults from the drop down list provided. In the Inventory Item Defaults window
that opens, select the GL Accts/Costing tab. The window appears as follows:

In this window you need to delete all instances of the account number of the account you wish to delete.
For example, if you wish to delete the 'Cost of Sales-Salary & Wage' account (account number 5400)
you need to find and delete all instances of this account number in the table.
Once the appropriate account numbers have been deleted from the table, click OK.
You should then be able to follow the procedures outlined above to delete the account using the
Maintain Chart of Accounts window.
Note that you are not able to delete an account if any transactions
have been recorded in that account. However, if you have transactions recorded for an
account that you want to delete, you really should be questioning whether
you should be deleting that account in the first place!

Helpful Hint!
The instructions on this page detail how to amend your chart of accounts
to match your business needs. However, if you are in the process of
transferring your existing accounting records into Peachtree
for the first time, you may need to enter beginning balances for some of the accounts.
You can find instructions on how to enter these balances in the
Beginning balances link in the Company section in this
learning center.
Note that entering the beginning balances of the accounts is the next step after setting
up your chart of accounts if you are completing the Peachtree Practice Set.
Return to the top