Modifying the accounts list (chart of accounts)
When you created your company file,
your MYOB software automatically created an accounts list
based on the industry classification and type of business selected in the
New Company File Assistant. While many of these accounts
will exactly match your business needs, others may not. You may find that you need to do one or
more of the following:
While you almost certainly will need to tailor the accounts list to your business after you
set up your company in your MYOB software, you may also need to alter the accounts list as your
business needs change. For example, your business may take out a long-term loan
and needs to create a new account to record the details of the loan.
This topic shows you how to add, modify and delete a general ledger account from the accounts list.
It also shows you how to change the level of an account should the need arise.
Opening the Accounts Easy Setup Assistant
Adding, modifying or deleting accounts in your MYOB software is done through the Accounts Easy Setup Assistant.
To open this assistant, from the menu bar select
Setup then Easy Setup Assistant.
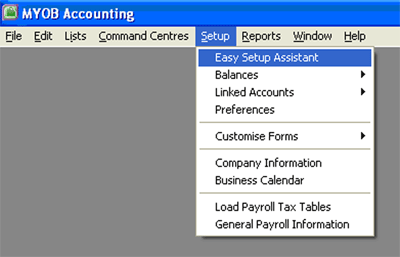
This displays the Easy Setup Assistant window where you can set up different sections of your MYOB software.
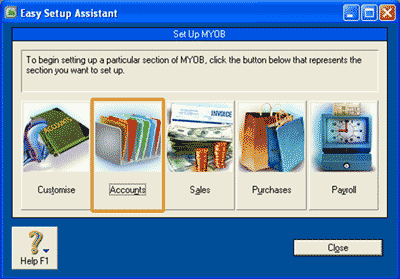
Click the Accounts icon to open the Accounts Easy Setup Assistant. Then, either select
the Next button or select Accounts List from list of options presented in the navigation list
on the left hand side.
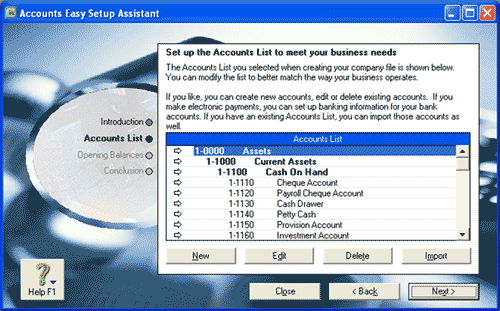
You should see the following
'Set up the Accounts List to meet your business needs' window. From here you can add, delete or modify
a general ledger account from the accounts list.
 top
top
Add a new general ledger account
Warning!
Be very careful when entering any information into the Edit Accounts window. There is no
cancel or undo button in this window, so whatever you enter will be saved when you close the window!
To add a new general ledger account into your MYOB software, in the
'Set up the Accounts List to meet your business needs' window, click New. This opens the Edit Accounts Window
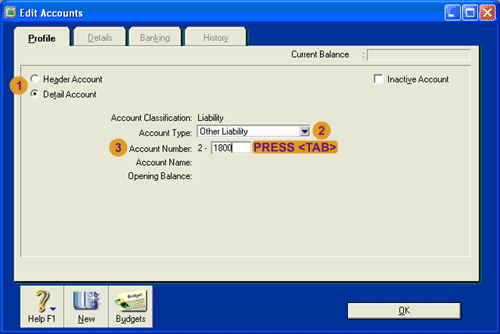
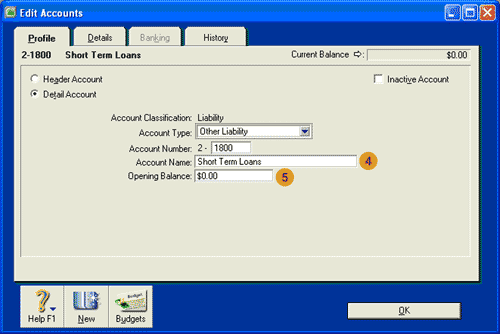
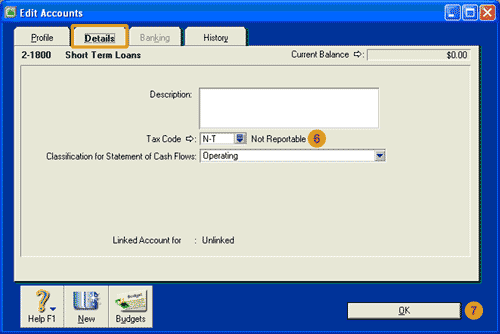
where you can add the new account. The following screenshots and reference table
show step-by-step instructions on how to add a new account into the Edit Accounts window.
Note that each step is assigned a reference number to help you identify the
appropriate field or icon in the screenshots.
| Step |
MYOB software field or icon |
Action |
 |
Header or Detail Account |
Select whether the new account is to be a header or a detail account.
- Detail accounts are accounts that are used when recording transactions.
Detail accounts are not bolded in the accounts list.
- Header accounts can not be used to record transactions.
Header accounts group similar detailed accounts together, which are shown indented under the
header account in the accounts list. Therefore the balance of a
header account equals the sum of its detailed accounts.
There can be up to three levels of header accounts.
Header accounts appear in bold type in the accounts list.
|
 |
Account Type |
Select the account type from the drop down list provided. Notice that the Account Classification
and the first digit of the Account Number change depending on the account type selected.
|
 |
Account Number |
Enter the last four digits of the account number. Note that the first digit of the account number is
automatically assigned depending on the Account type selected.
You should notice that you are unable to record the account name yet. To reveal the input field
for the account name you need to press <tab> on
your keyboard after entering in the account number. This reveals the Account Name and
Opening Balance fields.
|
 |
Account Name |
Type in the name of the account.
|
 |
Account Balance |
If you are completing our software practice set you are asked to leave this
field as $0.00. This is because the opening balances of all of the accounts will be entered
after the accounts list is finalised.
|
 |
Tax Code |
Select the Details tab and then select the tax code for this account from the options provided.
|
 |
OK button |
Once you have entered the required information, click OK to save the record and
create the new account. Notice that the new account now appears in the Accounts List in the
Accounts Easy Setup Assistant.
|

Helpful Hint!
If you are completing our software practice set you are
asked to ignore the entry in the Classification for Statement of Cash Flows field.
top
Modify an existing account
When setting up your accounts list, sometimes there might be an account that
would be perfect for your business if only the description of the account
was slightly different. Instead of deleting the account and adding
a new one, you are able to modify the existing account to suit your business.
To modify an existing account you need to open that account in the Edit Accounts window. This is
done either by selecting that account in the Accounts List in the Accounts Easy Setup Assistant
and clicking the Edit button, or simply by double clicking the account in the Accounts List.
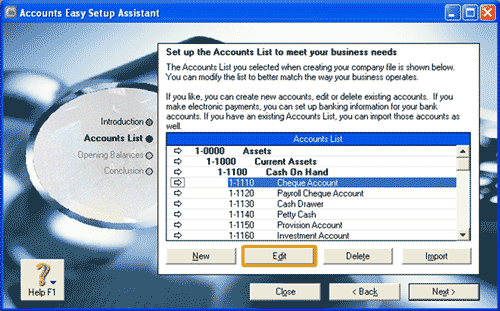
Once the Edit Accounts window is open you are able to make the necessary changes to the account.
You may need to click the Profile tab or the Details tab to enter the information you wish to change.
After you have made your changes to modify the account, remember to click OK to save your changes.
top
Delete an account
When reviewing your accounts list you may find that it contains accounts that
you do not plan to use in your business. To minimise the number of accounts that you have to manage
you can delete those accounts that are not used in your business.
To delete an account, in the Accounts Easy Setup Assistant, select the account you wish to
delete in the accounts list. Then, simply click the Delete button. Notice that
your MYOB software will automatically update the account
list to remove the deleted account.
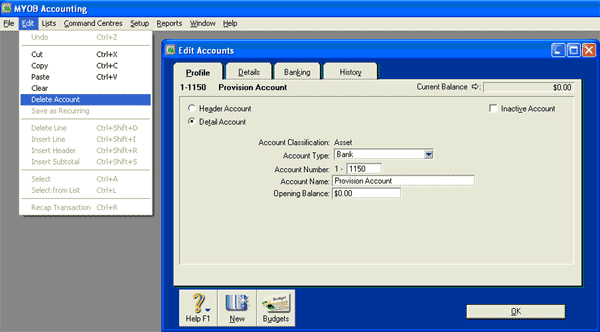
Alternatively, open the account in the Edit Accounts window by double clicking it in the
accounts list, or selecting it in the accounts list and clicking Edit. Then, from the Edit menu, select
Delete Account. The Edit Accounts Window will close and the account will be removed from the accounts
list.
Having trouble deleting an account?

Helpful Hint!
If you are completing our software practice set,
you will need to follow these instructions to delete certain linked accounts such as
Freight, Discounts Taken and Payroll Cheque.
If you are having trouble deleting an account, it may be that you are trying to delete an account that
is a linked account. A linked account is an account that your MYOB software uses to post
regular business transactions. In order to delete a linked account
you need to first change your settings so that it is no longer specified as a linked account.
To change these settings, from the menu bar select Setup, Linked Accounts and then select
the appropriate category. In this case, we have selected the Sales Accounts option.
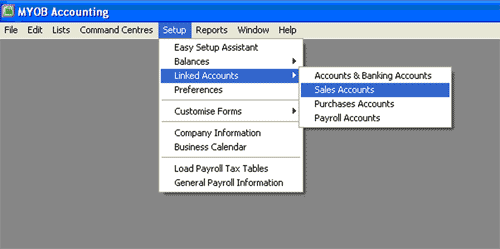
This opens the Sales Linked Accounts window. Any account that is specified in this
window is a linked account that is not able to be deleted from your accounts list.
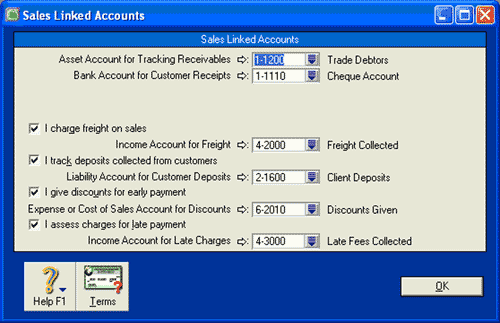
In this window you need to remove all instances of the account number of the account you wish to delete.
Your MYOB software requires you to specify a linked asset account for tracking receivables and a linked
bank account for customer receipts. However, for the other options you can remove the ticks from
the check boxes so that account is no longer a linked account.
If you are completing our software practice set, after you have
unticked the boxes your Sales Linked accounts
window should look like this:
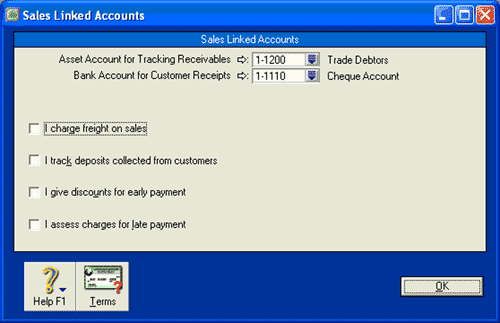
Click OK to save your changes. Once the account has been removed from the Sales Linked Accounts Window,
you should then be able to follow the procedures outlined above to delete the account using the
Accounts Easy Setup Assistant window.

Helpful Hint!
If you are completing our software practice set
you are required to make the following changes to linked accounts:
Sales: From the Setup menu, select Linked Accounts
→ Sales Accounts.
In the Sales Linked Accounts window, remove the ticks from all check boxes and then click OK.
Purchases: From the Setup menu, select Linked Accounts
→ Purchases Accounts.
In the Purchases Linked Accounts window, remove the ticks from all check boxes and then click OK.
Payroll: From the Setup menu, select Linked Accounts
→ Payroll Accounts.
In the Payroll Linked Accounts window, ensure the following payroll linked accounts are chosen:
- In the Bank Account for Cash Payments field, select
1-1180 (Undeposited Funds Account).
- In the Bank Account for Cheque Payments field, select
1-1110 (Cheque Account).
- In the Bank Account for Electronic Payments field, select
1-1190 (Electronic Clearing Account).
- In the Default Employer Expense Account field, select
6-1930 (Wages & Salaries).
- In the Account for Wages Paid field, select
6-1930 (Wages & Salaries).
- In the Default Tax/Deductions Payable Account field, select
2-1420 (PAYG Withholding Payable)
You are not required to change any of the other options in this window. Click OK once
you have made your changes.
top
An alternate way to add, modify or delete an account
You are able to add delete or modify an account using the Accounts List window. To open this window,
go to the Accounts Command Centre and click Accounts List. Then:
To add an account: Click the New icon to open the Edit Accounts window where you
can enter the details of the new account.
To modify an account: Double click the account or click the Edit button
to open the account in the Edit Accounts window. Make the necessary changes to the account, remembering
that you may need to click the Profile tab or the Details tab to enter the
information you wish to change. After you have made your changes to modify
the account, remember to click OK to save your changes.
To delete an account: You must double click the account or click the Edit button
to open the account in the Edit Accounts window. Then from the edit menu select Delete Account. The
Edit Account window will close and the account will be removed from the Accounts List.
Specifying the level of an account
After you have added, modified or deleted the appropriate accounts from your accounts list, you should
check that all accounts are grouped correctly and have the correct account level.
To view the levels of the accounts in your accounts list, go to the Accounts Command Centre
and click Accounts List. This displays the accounts list window.
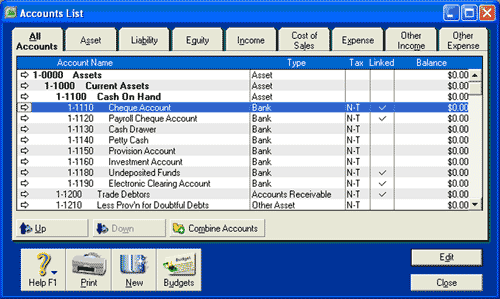
In this window you can see the following four account levels:
| Account Level |
Example |
| Level 1 |
1-0000 Assets |
| Level 2 |
1-1000 Current Assets |
| Level 3 |
1-1100 Cash On Hand |
| Level 4 |
1-1110 Cheque Account |
Notice that the first three accounts in the example are bolded, because they are header accounts.
The Level 4 account, 1-1110 Cheque Account, is not bolded and is a detail account that is grouped
with three header accounts above it. Note that not all detail accounts are Level 4 accounts;
the level of a detail account depends on how many header accounts are above it.
When you specify the level of an account, it means that you are grouping a detailed account with the
header account(s) directly above it.
To increase the level of an account,
in the Accounts List window,
highlight the account
that you wish to change and click the Up icon. Alternatively, if you want to
decrease the level of an account, highlight the appropriate account and click the Down icon.
Note that you must be careful when changing account levels because your MYOB software may
move the levels of other accounts below that account in the Accounts List.
Once you have specified the correct
account levels, it is a good idea to print the Accounts List [Detail] report
and review the Level column in that report to double check that the account levels are correct.
Note that to be able to display and print that report, you may need to customise that report
to include $0.00 balances. To do this, select the
Accounts List Detail report in the Index to Reports window (Accounts tab). Click the customise
button to display the Report Customisation - Accounts List Detail window and select the Finishing tab.
Ensure that the Include $0.00 Balances option is ticked and then click the Display button.
Providing this report shows that your account levels are correct, you are now ready to
return to the Accounts Easy Setup Assistant
window where you can enter the opening balances of
your accounts.
Return to the top