Add a vendor
After you have
set up the vendor default information, you are ready
to enter details about your individual vendors in Peachtree.
This topic shows you how to add a vendor's details
into Peachtree, and how to modify or delete an existing vendor's record should the need arise.
Add a vendor
To enter information about a vendor into Peachtree, open the Vendors & Purchases
Navigation Center.
Click the Vendors icon and select New Vendor
from the drop down list provided.
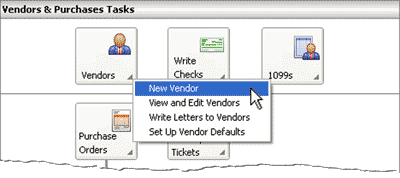
This opens the Maintain Vendors window where you enter information about the vendor in Peachtree.
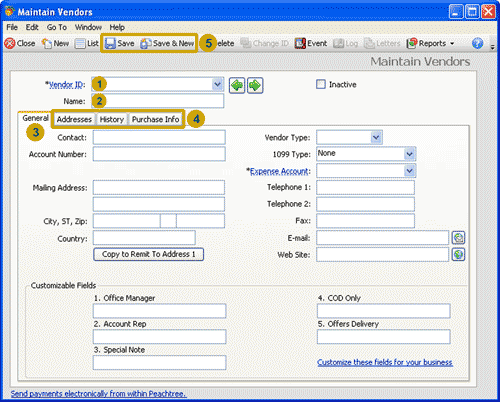
The following screenshot and reference table show step-by-step instructions on how to
enter the details of the vendor into the Maintain Vendors window in Peachtree. Note that
each step is assigned a reference number to help you identify the appropriate field or icon
in the Maintain Vendors screenshot.
The Maintain Vendors window with reference numbers
Enter vendor beginning balances into Peachtree
Entering the beginning balances of your vendor accounts is an important step
in setting up vendor records in Peachtree. This step is relevant if
you are converting your existing accounting system to Peachtree and there
are still amounts owed to existing vendors at the start of your
conversion period. However, this step can be omitted if you are using
Peachtree at the same time you start up business or if you are creating a new vendor that
your business has never dealt with before.
To enter the beginning balance owed to vendors, click the History tab in the
Maintain Vendor window. Down the bottom of this window,
click Vendor Beginning Balances.
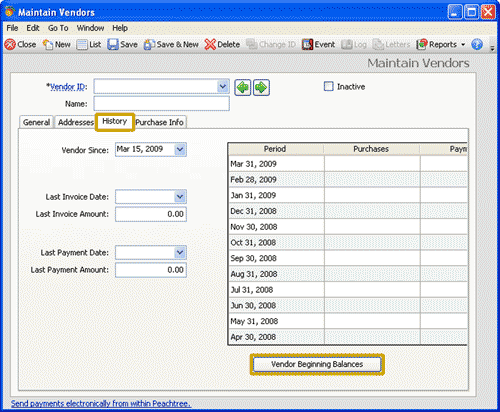
This will open the Vendor Beginning Balances window for that vendor.
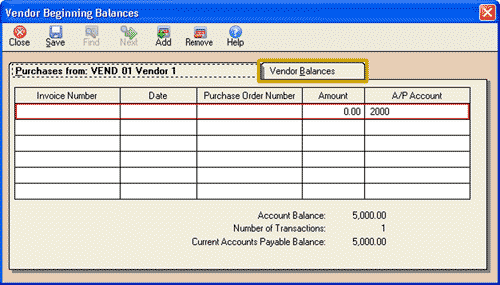
To enter the details of an outstanding purchase invoice (bill), record the invoice number, date
purchase order number (if applicable) and amount owed to the vendor.
You can record more than
one unpaid purchase invoice if those purchases have not been paid in full at the time
your business is converting to Peachtree. Click the Save icon to save the beginning
accounts payable balance for that vendor.
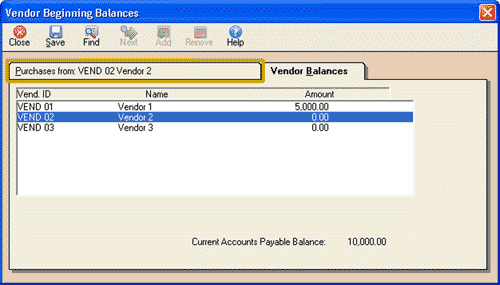
To continue recording the balances of more than one vendor at a time,
click on the Vendor Balances tab. The example below shows a list of three vendors
that have been created in Peachtree.
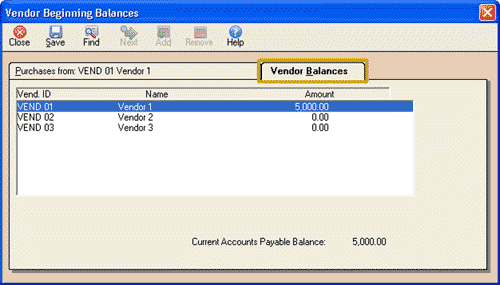
You can select a vendor from the list by clicking on the vendor’s name. Notice that
once the vendor is selected, the name of the first tab changes to display the
name of the vendor you have selected.

Click on the first tab to enter the purchase invoices that make up the beginning
balance for that vendor. You can follow this process for as many vendors you have
set up in Peachtree. Remember to click the
Save icon once you have entered the balance for each one!
Changing a vendor's default information
The payment terms that are offered by a particular vendor may be different to the
vendor default terms you set up in Peachtree. For example, you may receive purchase discounts
from most of your vendors but do not get any discounts from a particular vendor.
To override the default settings for one particular vendor, open the
Maintain Vendors
window for that vendor and select the Purchase Info tab. Under the Terms and Credit heading,
select Customize terms for this vendor from the drop down list provided.
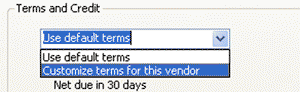
You are then able to alter the settings for this vendor as displayed below.
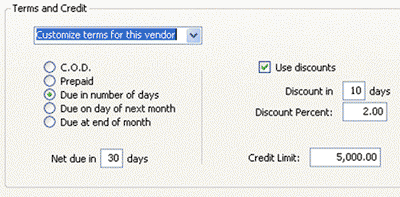
Note that any terms that you alter are only applied to this vendor. The default terms
you entered when you set up the vendor default information will apply to all other vendor
records if you have not customized their terms.
top
Modifying or deleting vendor records
After you have created your vendor records, you may need to modify the information recorded in
those records. For example, you may deal with a new contact person about the account
so you may have to change the contact name for that vendor.
Or you may need to delete a vendor record for some reason.
Read on to find out how to modify or delete a vendor's record in Peachtree.
Modifying vendor records
In order to alter your vendor records, you simply open the
Maintain Vendors window for that vendor, make the required changes,
and save your changes.
But how do you open the Maintain Vendors window for a particular vendor?
There are several ways this can be done.
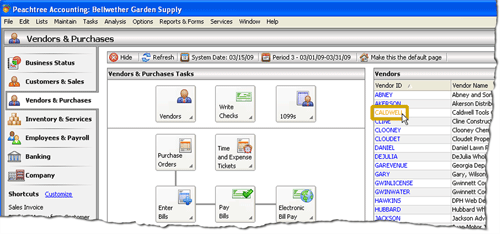
One approach is to look for the name of the vendor in the Vendor list in the
Vendors & Purchases Navigation Center. Click on the name of the vendor to open the
Maintain Vendors window for that vendor.
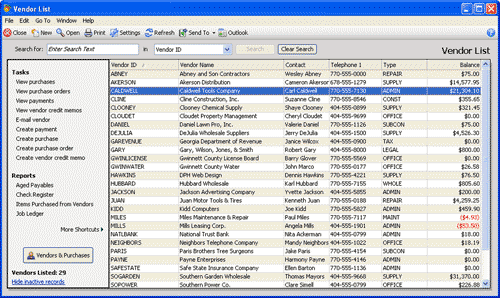
Alternatively, you can locate the vendor's record through the Vendor List window.
To display the Vendor List window, click on the Vendors icon and select the View and Edit Vendors option
from the drop down list available. In the Vendor List window that appears, you
can double click the name of the vendor to open the
Maintain Vendors window for that vendor.
Note that there are other ways to open the
Maintain Vendors window for a particular vendor. We encourage you
to explore Peachtree to find the way that best works for you!
Deleting vendor records

To delete a vendor's record in Peachtree, perform the steps above to open the
Maintain Vendors window for that vendor.
Once open, click the Delete icon. You will be asked 'Are you sure you want to delete this record?'
Click the Yes button to delete that vendor's record from Peachtree. Note that Peachtree does not
allow you to delete a vendor's record that has transactions applied to it.
However, if you have transactions
recorded for a vendor's record that you want to delete, you really should be questioning whether you
should be deleting that vendor record in the first place!
Return to the top