Add an item of inventory
Before you are able to record transactions relating to inventory,
you first need to set up your inventory items in Sage 50. This topic shows you how to add
an inventory item into Sage 50, and how to modify or delete an item of inventory
should the need arise.
Add an item of inventory
To add an item of inventory into Sage 50, open the Inventory & Services Navigation Center in Sage 50.
Click the Inventory Items icon and select New Inventory Item
from the drop down list provided.
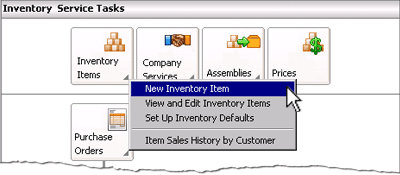
This displays the Maintain Inventory Items window where you can enter the details of the inventory item
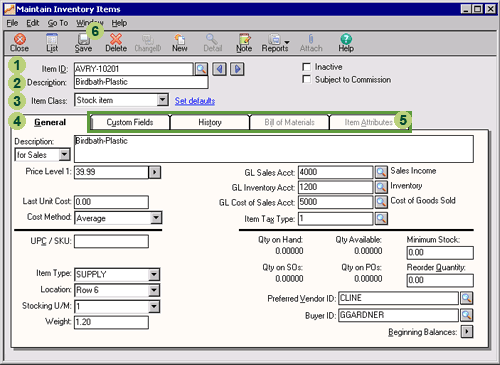
into Sage 50. The following screenshot and reference table show step-by-step
instructions on how to enter an inventory item into the Maintain Inventory Items window in Sage 50.
Note that each step is assigned a reference number to help you identify the
appropriate field or icon in the screenshot.
The Maintain Inventory Items window with reference numbers
| Step |
Sage 50
field or icon |
Action |
 |
Item ID |
Enter a short identification code for the item of inventory.
|
 |
Description |
Enter a short description of the item of inventory.
|
 |
Item Class |
Select the class of the item from the drop down list provided. For items of inventory to be resold
you should select 'Stock item'.
|
 |
General tab |
Enter the relevant information about that item. Note that for stock items you do not need to enter
information into the Last Unit Cost field. Sage 50 will automatically update this field when
you enter the beginning balances of inventory items into Sage 50
as described below.
|
 |
Other tabs |
Enter the required information in the other tabs. Note that if
the Item Class selected is Stock item,
you are unable to enter any information
into the Bill of Materials tab or the Item Attributes tab. This is because the Bill of Materials tab
is used only if the Item Class selected is Assembly, while the
Item Attributes tab is only used if the Item Class selected is Master Stock item.
|
 |
 Once you have entered the information in the Maintain Inventory Items window, remember to
review your entries and save the item of inventory by clicking the Save icon.
|

Helpful Hint!
If you are completing the Sage 50 Practice Set,
you only need to use the General tab
to enter the inventory information provided.
Enter the beginning balances of inventory items
If you are transferring your existing accounting records from another accounting system into
Sage 50 for the first time, after adding the inventory item into Sage 50 you will also need to enter the
beginning balance of each item of inventory.
You can either enter the beginning balance of each item as you create the item using the
Maintain Inventory Items window. However, if you are creating several items of inventory at once,
you may find it more efficient to enter the beginning balances of these items altogether
at the same time.
To enter the beginning balance
of each inventory item, click the Beginning Balances arrow down the
bottom right hand corner of the General tab in the
Maintain Inventory Items window.
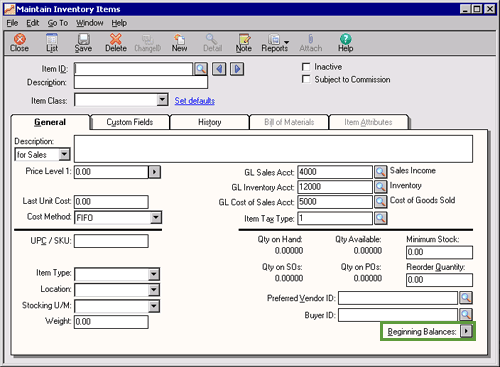
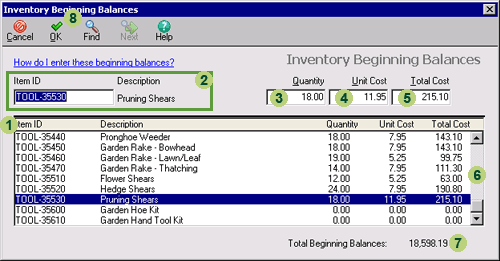
This will open the Inventory Beginning Balances window. The following screenshot and
reference table show step-by-step instructions on how to enter the beginning balance of an inventory item
into the Inventory Beginning Balances window in Sage 50. Note that each step is assigned a
reference number to help you identify the appropriate field or icon in the screenshot.
The Inventory Beginning Balances Window with reference numbers
| Step |
Sage 50
field or icon |
Action |
 |
List of Inventory Items |
Select the item of inventory from the list by clicking on it.
|
 |
Item ID and Description |
Note that the Item ID and the description of the item selected appears at the top of this screen. Confirm
that you have selected the correct item that you wish to enter the beginning balance.
|
 |
Quantity |
Enter the number of units of that inventory item on hand in the Quantity field.
|
 |
Unit Cost |
Enter the purchase price (unit cost) of one unit of that item of inventory.
|
 |
Total Cost |
Notice that Sage 50 automatically calculates the total cost of that many items of that type of inventory.
|
 |
Scroll bar |
Use the scroll bar to scroll down to select the next type of inventory
to enter the beginning balance.
|
 |
Total Beginning Balances |
When you select the next inventory item to enter the beginning balance, Sage 50 automatically
recalculates the total beginning balances of all inventory items held by the business.
Once you have entered the beginning balances for all of your inventory items, you should check that the
total beginning balances reported in this window is equal to the beginning balance of the Inventory account
in the general ledger.
|
 |
 Once you have entered the information in the Inventory Beginning Balances window, remember to
review your entries and click the OK icon to save the information and update the inventory totals.
|
Alternative ways to enter the beginning balances of inventory items.
The instructions above detail how to enter the quantity and unit cost of each item of inventory. However,
you are also able to enter the quantity and then the total cost of all of that type of inventory item.
Sage 50 will then automatically calculate the unit cost of the item.
top
Modifying or deleting inventory records
After you have set up your inventory records you may need to alter the information
recorded in them. For example, a particular item of inventory may prove extremely popular
so you may want to increase the minimum stock or reorder quantity of that item.
Or you may find that you need to delete
an inventory record for some reason. Read on to find out how to modify or delete
an inventory record.
Modifying inventory records
In order to modify the inventory record you simply open the
Maintain Inventory Items window for that item of inventory,
make the required changes, and click Save.
But how do you open the Maintain Inventory Items window for a particular item of inventory?
There are several ways this can be done.
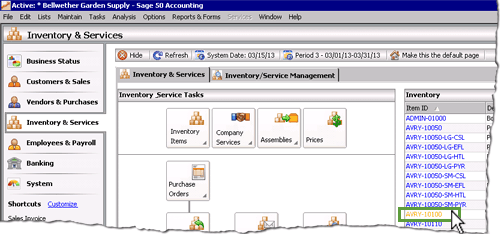
Possibly the quickest way is to find the name of the inventory item in the Inventory list in the
Inventory & Services Navigation Center. Click the Item ID of the inventory item to open the
Maintain Inventory Items window for that item of inventory.
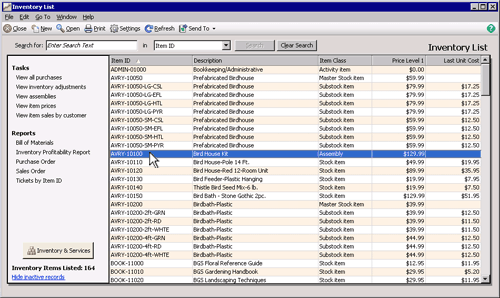
Alternatively, you can click the Inventory Items icon and select View and Edit Inventory Items
from the drop down list. This will open the Inventory List window as shown below. There you can double click
the inventory item to open the
Maintain Inventory Items window for that item of inventory.
Note that there are other ways to open the
Maintain Inventory Items window for a particular item of inventory.
We encourage you to explore Sage 50 to find the way that best works for you!
Deleting inventory records

To delete an inventory record in Sage 50, follow the steps above to open the
Maintain Inventory Items window for that item of inventory.
Once open, click the Delete icon. You will be asked 'Are you sure you want to delete this record?'
Clicking Yes will delete that inventory record from Sage 50. Note that you are not able to
delete an item of inventory if any transactions have been applied to that item, including
beginning balances.
However, if you have transactions
recorded for an item of inventory that you want to delete, you really should be questioning whether you
should be deleting that inventory record in the first place!
Return to the top