How to use Perdisco e-learning
If you're new to using Perdisco's e-learning products, or you're not quite sure how something works, here are a few basics to get you started:
My Account
To use Perdisco, you first need to register an account (See our support page for help with registration).
You can add multiple products, over multiple semesters, to your account by clicking on Add a product to my account in the Action menu.
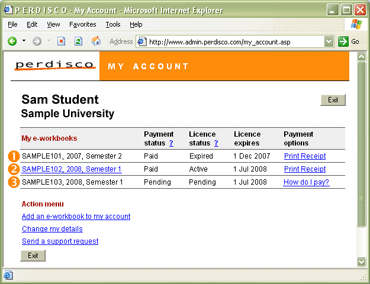
In this example:
- SAMPLE101 was purchased for Semester 2, 2007 and can no longer be accessed because it expired at the end of the semester on 1 December 2007.
- SAMPLE102 was purchased for Semester 1, 2008 and will remain open until the end of the semester on 1 July 2008.
- SAMPLE103 has been added to Sam's account but cannot yet be accessed because it has not yet been paid for. Sam can pay for this product by clicking on How do I pay?
To change or update any of your personal details such as your name, password or student number, click on Change my details in the Action menu.
E-learning features and functions
There are a number of basic functions that you will need to learn in order to use your Perdisco e-learning product. They are:
Parts: Using the 'Show' and 'Hide' functionality
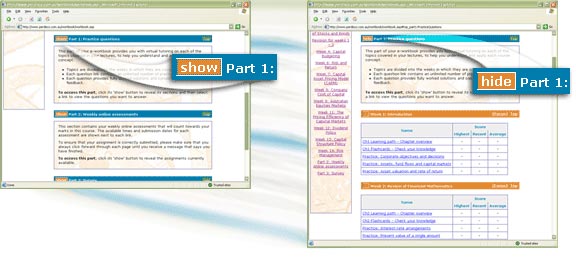
Within your Perdisco e-learning product, you will find that similar content links are grouped together into tables known as Sections.
We will discuss 'Sections' in more detail below.
Some products contain a large number of sections, and so to avoid having to scroll and search for section headings, we often group similar sections
together into Parts.
When you first open your e-learning product, you will be shown each of its 'Parts'. On the left side of each part's heading bar, there is a button
labelled 'Show'. Clicking on 'Show' will reveal all of the sections within that part. Once opened, the 'Show' button will change to 'Hide'.
To close that part again, click the 'Hide' button.
Sections and content links
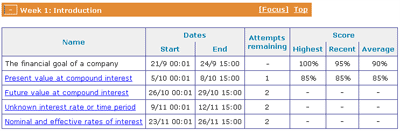
Each 'Part' within your e-learning product is divided into Sections. As mentioned earlier, each section contains a collection of content links
of a similar type - for example: the practice questions for a particular topic or week, all of your weekly quizzes or assessments, or your revision links for
for a particular portion of the semester.
Each section table is divided into the following columns:
- Name: This column contains the actual links. To begin working on a link, simply click on its name.
- Score: This column is usually divided into 'Highest', 'Average' and 'Recent' scores to give you a better idea of how you have performed on this link
over multiple attempts. For assessment links, it is likely that you will only be shown the score ('highest' or 'average') that your instructor
has chosen to count towards your course assessment.
- Dates: This column is only shown when the links within that section are set to 'Start' and/or 'End' on
specific dates chosen by your instructor. Before and/or after the dates shown, the link to a date restricted exercise will be inactive.
For this reason, dates are often used by instructors to restrict the opening and closing dates of online assessment tasks.
- Attempts remaining: This column is only shown when the links within that section are limited by the number of attempts students are allowed to
complete. Because of this, the 'Attempts remaining' column is often used in sections that contain assessment tasks. For example, if an assessment link
shows '2' next to it in the 'Attempts remaining' column, the student is able to complete and submit the task twice. After this time, the link will become
inactive. After the task has been submitted once, the link will remain active but the 'Attempts remaining' will drop down to '1'.
Focus

Each section heading bar contains a Focus link. Clicking on this link allows you to focus on that particular section by hiding all other sections
and parts. Once you have focused on a section, the 'Focus' link will change to All. Click All to return to the original view where all
sections are shown.
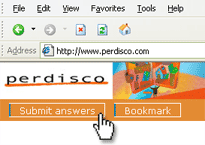
Bookmark
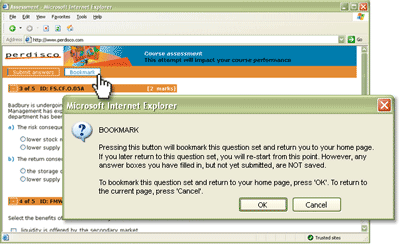
If you are working on an exercise but you are not yet ready to submit your answers or you would like to leave the exercise and come back to it at a later
time, you can Bookmark the page you are up to by clicking the Bookmark button at the top or bottom of your e-learning
page. This is generally located next to the 'Submit answers' button. Make sure that you do not use your browser's 'add to bookmarks' or 'add to favourites'
functionality instead. Using these will not record the page you are up to.
It is important to remember that your e-learning's 'bookmark' functionality is designed to record the question page that you are up to, but
will not save any answers you may have entered but not yet submitted.
To return to the page you have bookmarked, click on the link you originally used to access the question page and you will be returned to that page. The
questions you are presented with should be exactly the same as when you last used that particular link. If you would now like to submit your answers to those
questions, you can do so by entering your answers and clicking on the 'Submit answers' button (further explained below).
Submit answers
Once you have finished entering your final answers into a question page, you can submit those answers and receive feedback on your performance by
clicking the Submit answers button.
If you are completing an assessment task, you should be careful not to click the 'Submit answers' button until you are certain that the answers you have
entered are the answers you would like to be marked. Once submitted, you cannot go back to change your answers and the score you achieve may count towards
your final assessment mark.
More information?
For further information on using your e-learning, please refer to our support page.